With Sitecore 9.0 and the introduction xConnect you might be wondering what you are going to do with all that analytics data sitting in MongoDB, when you upgrade your Sitecore 8.x instance to Sitecore 9. Well, Sitecore have created a tool called the xDB migration tool. The tool uses the Sitecore Data Exchange Framework 2.0 and it provides the ability to read from MongoDB (source system) and write to the xConnect server (target system). If you are not familiar with the Data Exchange Framework I have covered it in an earlier post.
The xDB migration Tool provides a pre-configured mapping of data from the MongoDB database to the xConnect server in the form of a DEF Tenant. The Tool includes two data migration processes.
- MongoDB Contacts to xConnect Contacts – Reads contact data and related device and interaction data for each contact – from a MongoDB database and writes it to xConnect.
- MongoDB Reference Data to xDB – Reads geo IP and location data from a MongoDB database and writes it to xConnect.
Installation
You will need to download and install the following Sitecore packages if you’ve not done so already:
- Data Exchange Framework 2.0
- MongoDB Provider 2.0
- Sitecore Provider 2.0
- xConnect Provider 2.0
- xDB Migration Tool
Notes: Install the DEF and providers prior to installing the xDB migration tool as it has dependencies on the DEF and the providers.
My Sitecore 8.x MongoDB
I have a Sitecore 8.2 instance running with the Launch Sitecore Site package installed. I’ve clicked around and triggered a goal and built up a profile for my contact: Fred.

Before I start configuring DEF and the xDB migration tool I need a way of telling my Sitecore 9 instance where it can locate the MongoDB (source system) to load the data from. To do this I need to add a new connection string to the ConnectionString.config that points to the 8.x MongoDB
<add name="sc82u2Coveo_analytics" connectionString="mongodb://localhost:27017/sc82u2Coveo_analytics" />
Keep the connectionstrings.config file open you will need it to configure the endpoints for xDB, xConnect Client and the xDB Reference Data Client.
Deploy the Collection Model
The xDB Data Migration Tool uses a custom collection model that identifies the data that can be written to xConnect. This custom collection model must be deployed to both the xConnect service and the xConnect indexer service.
-
- Navigate to Sitecore -> System -> Settings -> Data Exchange -> Providers -> xConnect -> Collection Models -> xDB Data Migration Tool -> xDB Data Migration Collection Model
- In the Ribbon click Convert model to JSON this will download the file Sitecore.DataExchange.Tools.XdbDataMigration.Models.DataMigrationCollectionModel, 1.0.json.
- Copy the file to [xConnect collection service root]\Website\App_data\Models for me this is located at C:\inetpub\wwwroot\sc900.xconnect\App_data\Models
- Browse to your xConnect server i.e. https://sc900.xconnect/
- If you receieve an Unknown Referenced Model error:
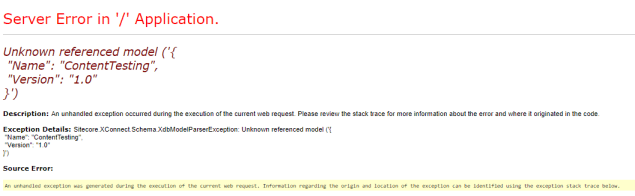
- Edit the JSON file you just copied and locate the following section and modify as follows:
{
"Name": "ContentTesting",
"Version": "1.0"
}
{ "Name": "Sitecore.XConnect.ContentTesting.Model", "Version": "1.0" } - Save the file this will have fixed the error.
- Copy the modified JSON file to [xConnect indexer service root]\Website\App_data\Models for me this lives in C:\inetpub\wwwroot\sc900.xconnect\App_data\jobs\continuous\IndexWorker\App_data\Models
Configuring the xDB Migration tool
When you navigate the System -> Data Exchange you will have a new insert option that allows you to create a new tenant called: xDB Data Migration 8x to 9. Unlike the empty Tenant this tenant comes already pre-configured with everything you need to:
- Extract – the profile data from MongoDB
- Transform – the xDB collections and models to the xConnect models.
- Load – the profile data into xConnect.
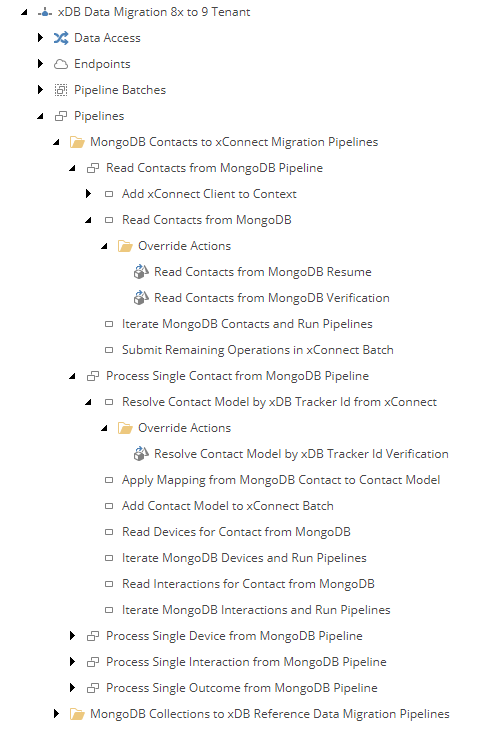
All the pipelines and pipeline steps you’ll need to migrate your data from MongoDB to xConnect already exist. Basically, Sitecore has done most of the work for you in figuring out the steps and mapping required to transform the complex profile data structures into xConnect models. They have packaged this all up into the xDB Data migration 8x to 9 tenant, leaving you only having to configure a few settings.
Configure Endpoints
You need to configure both the endpoints for xDB and xConnect.
- Select the migration Tenant and Navigate to Endpoints -> Providers -> MongoDB -> Mongo Database Endpoint
- You’ll need to configure the following settings for this endpoint:
- Connection String Name – Set this to the name of the MongoDB connection we added to the connections strings config file.
- On the Ribbon, you can hit the Run Troubleshooter button to verify the connection is working.
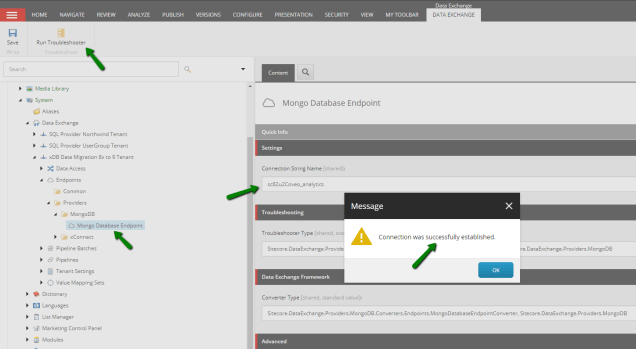
- Save the endpoint.
- Next, you need to configure the xConnect endpoint navigate to Endpoints -> Providers -> xConnect Client Endpoint
- For xConnect endpoint open your Sitecore instance connectionstrings.config file as you will need it to help you configure the following settings :
- Collection Model: defaults to Collection Models/xDB Data Migration Tool/xDB Data Migration Collection Model
- Collection Service Connection String Name – this name of the connection string for the xConnect client service: xconnect.collection
- Collection Service Certificate String Name – set the name of the connection string that describes the certificate used to connect to the xConnect client service: xconnect.collection.certificate
- Collection Service Credentials Connection String Name – you can leave this blank:
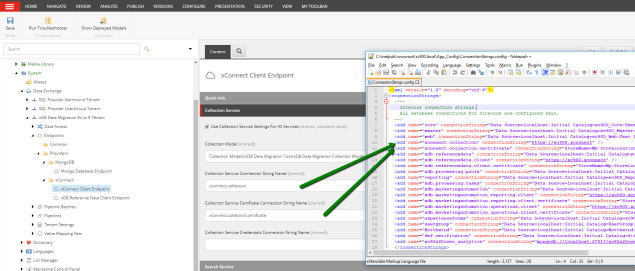
- On the Ribbon, you can hit the Run Troubleshooter button to verify the connection is working.
- Save the endpoint.
- Next, you need to configure the Endpoints -> Providers -> xConnect Client EndpointxDB Reference Data Client Endpoint settings:
- Client Connection String Name: xdb.referencedata.client
- Client Certificate Connection String Name: xdb.referencedata.client.certificate
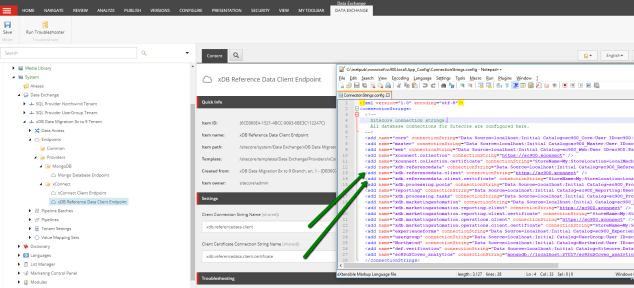
- again Run Troubleshooter and verify the connection is working.
Running the xDB to xConnect
We are now ready to run the xDB to xConnect migration tool.
- Check the Tenant is enabled as it is disabled by default. Navigate to Sitecore -> system -> Data Exchange -> xDB Data Migration 8x to 9 Tenant to enable it.
- Navigate to Pipeline Batches > MongoDB Contacts to xConnect Migration
- In the Ribbon click Run Pipeline Batch
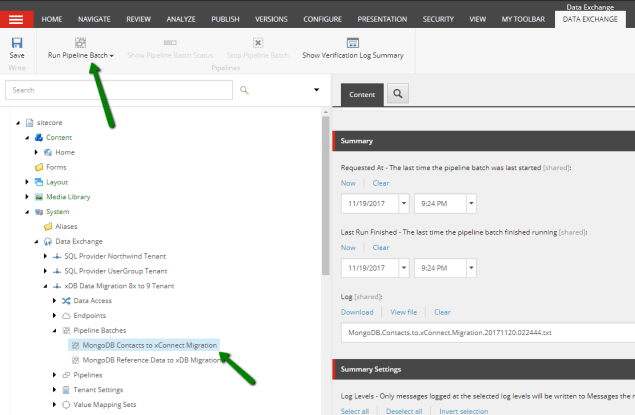
- The Pipeline Batch as a summary section which shows when it last ran access to the logs file and some other information.
- While the Batch is running you can click Show Pipeline Batch Status to get an update on the running Batch or click Stop Pipeline Batch
- Drum Roll please… while I navigate to the Experience Profile and see if Fred exists.
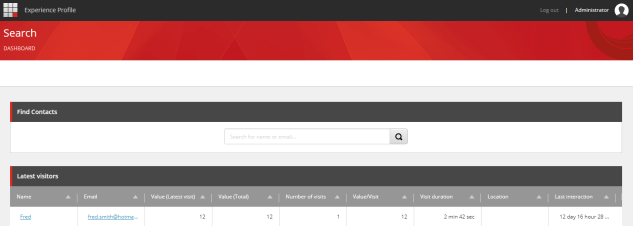
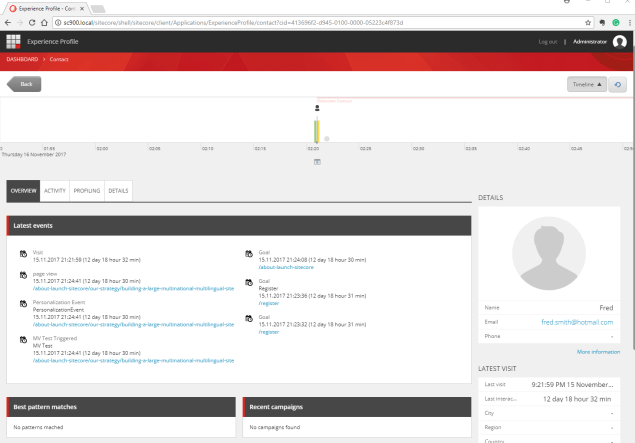
- WHOO HOO!! Welcome to Sitecore 9 Experience Profile Fred!!
Wait there is more
As if that is not awesome enough, there is more!! Sitecore has added an optional Verification feature. This is a standalone database which you install separately if you want to use it. When it is enabled it can track information about each entity submitted to xConnect. Information such as:
- SourceIdentifier – the Id for the MongoDB document.
- TargetIdentifier – the Id for the entity in xDB.
- TargetType – the type of entity in xDB.
- Hash of the data submitted to xConnect.
- Status – of whether the entity was successfully submitted.
- OperationType – whether the entity was created or updated.
- Full JSON of the data submitted.
The following is an example of the data that is captured in the verification database:

Why would you need this?
Let say you have a gazillion records in your 8.x MongoDB – all your contacts their page views, goals, interactions etc. You could migrate all those records or even just a sample batch of those records 1st time round and then migrate a percentage of the records in the first batch to ensure the records were mapped the exact same way the second time.
This gives you confidence in your ETL process and not only is this feature available just for the xDB migration tool – you can use it in your own custom integrations and write information to the verification database during any stage in your pipeline process.
What else could you use it for? I immediately thought of being able to Audit your integration transactions – this is a common requirement for customers.
Note: running the verification mode will slow down the performance of your integration.
Install & Configure the Verification Database
Installation is straightforward, simply download the verification database as SQL DacPac.
- Run the DacPac on your SQL instance – this will create a new database called Sitecore.DataExchange.Verification.
- Add a valid SQL database connection string to your Sitecore Instance connectionstrings.config file called def.verification.
- Navigate to Sitecore -> System -> Settings -> Data Exchange -> Framework -> Verification Log -> Database Verification Log and enter the name of the database from step 2 above: def.verification
- Verify the connection works using the Run Troubleshooter in the ribbon.
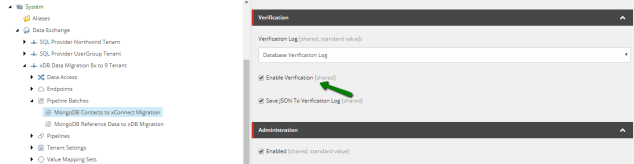
- Now you can enable the Verification feature on your Pipeline Batch in the Verification section.
Other Useful Stuff
Configure Batch Size – you can configure the size of the batches in your ETL process. This is really helpful especially if you have a large dataset like an existing MongoDB you need to load into xConnect.
xConnect Data Model – ever wonder what the xConnect Data model looked like? Well as part of installing the xConnect Provider you will get access to the xConnect data model facets from within Sitecore. Navigate to Sitecore -> System -> Settings -> Data Exchange -> Providers -> xConnect -> Collection Models -> Default -> Default Collection Model

You can see from the screenshot I’ve selected the facet property first name – is a PII Facet property also is indicated by having a different icon from other facet properties. Making PII (Personally Identifiable Information) fields easier to identify, which is big deal as it concerns the GDPR legislation being introduced across Europe.
Understand the pipelines steps for Complex Data Structures – the experience profile data contains some pretty complex data structures. By studying the various pipelines and pipeline steps that are installed and used by the xDB migration tool this will help you understand how you can to handle other complex data integrations.
Where is my Experience Profile Data?
I ran into this issue where my profile data was not being displayed in Sitecore 9. There is currently a bug in the Experience Profile default Search view to do with the filter dates – Wesley Lomax did a good job detailing this in his blog. Clicking on the dashboard as opposed to the Search view will get around this issue.
I still wasn’t seeing any experience profile data. Then I realized that I was in such a hurry to get play with Sitecore Sitecore 9 I had not completed all the Post Installation steps. These are detailed in Chapter 6 of Sitecore 9 installation guide so I ran through those.
I also needed to rebuild the xdb search index as my xdb Solr index had zero documents by running the following command on my xConnect instance: XConnectSearchIndexer -rr
This solved the issue and I now had data in experience profile. Ryan Bailey has written a good blog on this topic.
That just about covers most of the things you should be familiar with before you dive into migrating your 8.x MongoDB data to Sitecore 9. Hope you find it useful.

Great post, thanks a lot, it was really useful for me.
LikeLike