Generating Leads with Sitecore Personalize and Sitecore Send (Moosend)

Lead generation is such an important marketing practice for every business or brand and it comes in many different forms. Take the simple subscribe to receive discount offers email, almost every e-commerce site I’ve landed on recently has displayed one of these pop-ups. Sitecore Personalize makes it possible for your marketing team to easily add these lead generation experiences. While Sitecore Send (Moosend) allows marketing to stimulate and nurture visitor engagement through targeted and relevant communications. With the ultimate goal of converting visitors into lifelong consumers.

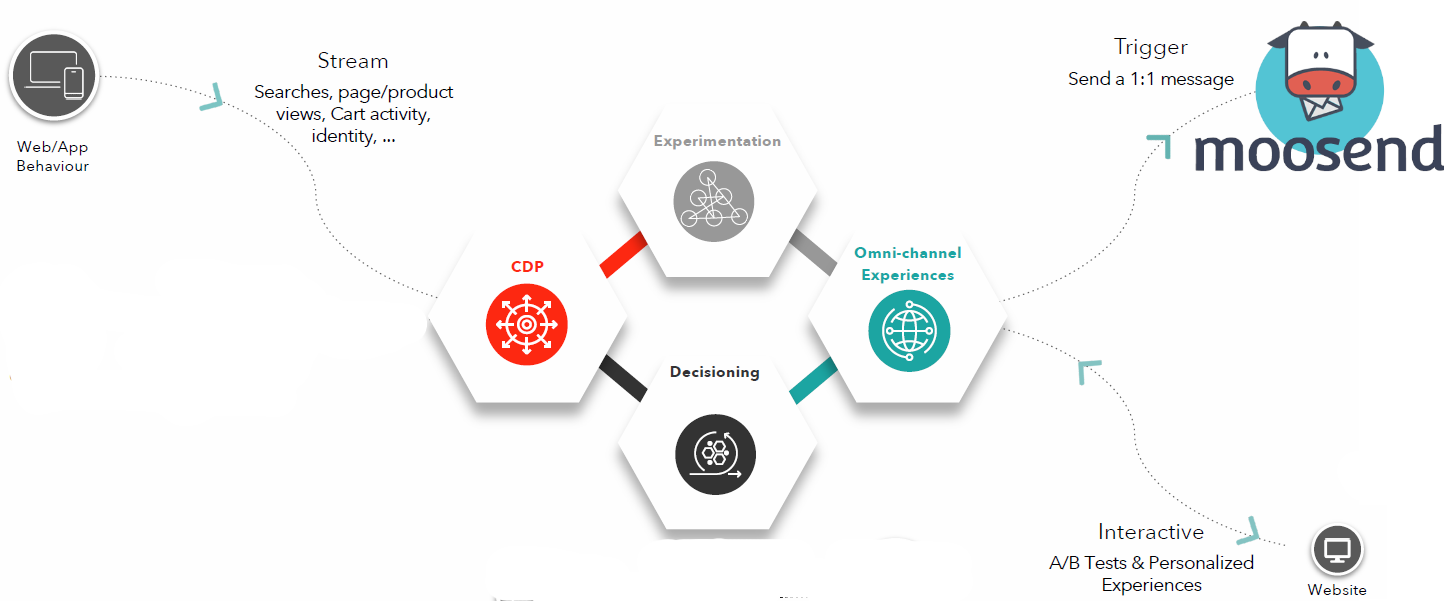
In a previous post, I showed how to easily integrate Sitecore CDP/Personalize with your existing site using GTM. In this post, I’ll show you how to capture the visitor’s name and email address using a Sitecore Personalize web experience, once a guest submits their information we’ll add them to a mailing list configured in Sitecore Send (Moosend).

To achieve this we will complete the following:

  1. Create a offers mailing list in Sitecore Send (Moosend) for customers so they can subscribe to receive offer emails.
  2. Take a look at the Sitecore Send REST API we will use to add a user to the mailing list.
  3. Create Data Connection in Sitecore Personalize for the API method.
  4. Create a Web Experience prompting user to enter name and email to subscriber to the email campaign that only displays when user has not previously subscribed.
  5. Create a Triggered Experience that will send user data to Sitecore Send using a data Connection to subscribe the user to the mailing list when the user submits the subscription pop up.
  6. Start the Experiences and Test.

At first glance, this might seem like a lot of steps to go through but it’s relatively straightforward to accomplish with Sitecore Personalize and Sitecore Send. Once you understand the various components involved, which I’ll guide you through, your marketing team will be able to re-use for similar scenarios.

Lots of good stuff!

Continue reading

Introduction to Sitecore CDP REST APIs and my Postman Collection

In this post, I will introduce the Sitecore CDP REST APIs and the postman collection I created for working with the APIs. I’m a huge fan of postman it’s an essential developer tool when it comes to working with a REST API.

Sitecore CDP does not currently provide a standard document like OpenAPI (swagger) for describing the APIs, which can be used to generate a postman collection. Therefore I’ve started a collection based on the Sitecore documentation and examples they’ve provided. The Sitecore docs are an excellent resource for developers, to help you understand the various APIs and attributes. I highly recommend checking these out as they are constantly evolving since the acquisition of Boxever.

My postman collection is available on GitHub as a json file. You can import it into Postman and use it when working with your own Sitecore CDP sandbox. I hope you find it useful, please share any feedback.

Continue reading

How to personalize your site with Sitecore CDP via Google Tag Manager

In a previous post, I’ve introduced Sitecore CDP with some tips and tricks to help you get started with this awesome platform. While there are a few different ways you can integrate Sitecore CDP with your site:

  • Direct client-side integration
  • Client-side integration via GTM (Google Tag Manager)
  • Server-side integration

I thought it would be helpful to demonstrate how to add CDP to the Next.js Commerce App via GTM. One of the benefits of this approach is it allows marketers to manage and deploy the CDP script to their site without having to modify the code. As the majority of sites already have GTM set up it should be relatively easy to add Sitecore CDP without getting the dev team involved. “Yey! we can do this ourselves, we don’t need any developers!” I hear you marketers holler!!

Now I’m not advocating you start adding scripts to your live site via GTM, as it does require some technical resources. Most marketing teams have analytic pros who understand the impact and risk of adding scripts and perform rigorous testing before publishing anything on a live site, to ensure there is no detrimental impact on performance or worse bring the entire site down. With great power comes great responsibility.

Continue reading

Sitecore CDP Tips and Tricks

Having recently completed the Sitecore CDP Developer Deep Dive training I discovered a few tips and tricks and wanted to share some learnings as you start to explore the platform for yourself. I hope you find this useful and maybe even save you some time.

Sitecore CDP actually consists of two products: Sitecore CDP & Sitecore Personalize. Depending on the client’s requirements they can opt to have either product or both. This will determine which features your client will have access to within the CDP platform.

Sitecore CDP

Sitecore Personalize

Sitecore CDP & Sitecore Personalize combined

User Interface

Having taken the free online Boxever training offered by Sitecore I was expecting the UI to be similar. However, it has since been rebranded and is now more Sitecore-esque.

As you can see from above the interval is simple yet intuitive with the various features easily accessible from the main navigation pane on the left. Here is a quick overview of those features accessible from the navigation pane:

  • Customer Data Tab
    • Guests – provides access to a list of guests including current online guests, with the most recent appearing first. The list is searchable to help you locate guests easily and view their profile. Note to search by the unique browser if assoicated with a visit you need to enter bid: Enter the browser id retrived from your browser assigned by CDP.
    • Segments – allows you build custom unified Segments which blend real-time behaviors and historical customer data.
    • Subscriptions Lists – list guests who have agreed to receive offers.
  • Experiences
    • Web – enables you to add Experiences to your website and monitor performance.
    • Full Stack – API driven Triggered and Interactive Experiences.
    • Flows – show Offers across multiple channels with Flows.
  • Experiments
    • Web – run AB Tests on your website. An experiment is essentially an A/B test of two or more variants.
    • Full Stack – run AB tests on API driven Triggered and Interactive Experiences.
  • Decisioning
    • Decision Models – add a decision model to recommend offers dynamically based on your business rules.
    • Decision Engines – deliver highly personalised content and offers to customers through business rules.
    • Offers – create Offer content that can be presented to a Guest in multiple channels.
  • Library
    • Web Templates – create reusable Marketer-friendly Web Templates for use in Web Experiences.
    • Audience Templates – create reusable Real-Time Audience Templates for use in Experiences.
    • Decision Templates – create reusable Decision Templates for use in Decision Models.
    • Flow Templates – a Flow Template defines configuration which will be used in a Flow.
    • Offer Templates – create Templates are Offer content.
  • Connections – allow you to create and manage connections to third party systems. These can be used for sending email or ingesting data.

NOTE: Experiences vs Experiments – there were a few occasions during the training when these two were mixed up. Experiments is A/B testing while Experiences allow you to design and implement user interactions and capture user data.

Continue reading

How to Integrate OrderCloud with Vercel Next.js Commerce

In my previous post, I demonstrated how to get the Sitecore OrderCloud headstart-nextjs running and deployed to Vercel. In this post, I will show you how to create a Vercel project using the Commerce template and steps to add Sitecore OrderCloud integration. How to then set up the project for local dev, make some basic changes and deploy those changes to Vercel.

Next.js Commerce Template

Vercel gives you the ability to create new projects, deploy existing projects or you can choose from one of their Templates. These templates are a great starting point to wrap your head around some of the Vercel concepts without having to start from scratch. I recommend checking them out.

The Commerce project template uses Next.js Commerce an all-in-one starter kit for high-performance e-commerce sites. It already boasts integrations out-of-the-box with the following commerce platforms: BigCommerce, Shopify, Swell, Saleor,Vendure and OrderCloud. With plans to support other platforms. Features include:

  • Performant by default
  • SEO Ready
  • Internationalization
  • Responsive
  • UI Components
  • Theming
  • Standardized Data Hooks
  • Integrations – seamless with the most common ecommerce platforms (Shopify, BigCommerce, Swell, Vendure, Saleor and OrderCloud).
Continue reading

Spin up Sitecore OrderCloud Next.js app on Vercel

In this post, I will introduce you to some of the handy developers tools provided by Sitecore OrderCloud to help you get up and running quickly with OrderCloud and Next.js. We will look at how to seed OrderCloud with some sample data, use the Console API to query the data, spin up an instance of the headstart-nextjs application and finally deploy the application to Vercel.

Continue reading

Composable approach to e-commerce with Sitecore OrderCloud

In April 2021 Sitecore announced the completion of their acquisition of Four51 to enhance their ecommerce proposition. Four51 a technology solutions company that designs, develops, and delivers digital transformation through modern, customizable eCommerce, order management and B2B marketplace solutions powered by its MACH (Microservices based, API-first, Cloud-native and Headless) architecture eCommerce platform, OrderCloud. By moving towards MACH architecture, Sitecore are enabling you to take advantage of a composable approach to e-commerce.

OrderCloud is meant to be the backbone of your commerce operations as an API-first, headless platform.

Continue reading