Having recently completed the Sitecore CDP Developer Deep Dive training I discovered a few tips and tricks and wanted to share some learnings as you start to explore the platform for yourself. I hope you find this useful and maybe even save you some time.
Sitecore CDP actually consists of two products: Sitecore CDP & Sitecore Personalize. Depending on the client’s requirements they can opt to have either product or both. This will determine which features your client will have access to within the CDP platform.
Sitecore CDP

Sitecore Personalize

Sitecore CDP & Sitecore Personalize combined

User Interface
Having taken the free online Boxever training offered by Sitecore I was expecting the UI to be similar. However, it has since been rebranded and is now more Sitecore-esque.

As you can see from above the interval is simple yet intuitive with the various features easily accessible from the main navigation pane on the left. Here is a quick overview of those features accessible from the navigation pane:
- Customer Data Tab
- Guests – provides access to a list of guests including current online guests, with the most recent appearing first. The list is searchable to help you locate guests easily and view their profile. Note to search by the unique browser if assoicated with a visit you need to enter bid: Enter the browser id retrived from your browser assigned by CDP.
- Segments – allows you build custom unified Segments which blend real-time behaviors and historical customer data.
- Subscriptions Lists – list guests who have agreed to receive offers.
- Experiences –
- Web – enables you to add Experiences to your website and monitor performance.
- Full Stack – API driven Triggered and Interactive Experiences.
- Flows – show Offers across multiple channels with Flows.
- Experiments –
- Web – run AB Tests on your website. An experiment is essentially an A/B test of two or more variants.
- Full Stack – run AB tests on API driven Triggered and Interactive Experiences.
- Decisioning –
- Decision Models – add a decision model to recommend offers dynamically based on your business rules.
- Decision Engines – deliver highly personalised content and offers to customers through business rules.
- Offers – create Offer content that can be presented to a Guest in multiple channels.
- Library –
- Web Templates – create reusable Marketer-friendly Web Templates for use in Web Experiences.
- Audience Templates – create reusable Real-Time Audience Templates for use in Experiences.
- Decision Templates – create reusable Decision Templates for use in Decision Models.
- Flow Templates – a Flow Template defines configuration which will be used in a Flow.
- Offer Templates – create Templates are Offer content.
- Connections – allow you to create and manage connections to third party systems. These can be used for sending email or ingesting data.
NOTE: Experiences vs Experiments – there were a few occasions during the training when these two were mixed up. Experiments is A/B testing while Experiences allow you to design and implement user interactions and capture user data.
Documentation
The documentation is split over a few locations:
- Knowledge Hub – great for practical advice, tips & troubleshooting.
- Developer Documentation– your standard dev docs with information on models, api’s, features etc.
- User Documentation – useful information for the end user on how to get the most out of the platform.
The team at Sitecore/Boxever have put together some best useful guides for best practices when it comes to implementing various features of the platform:
- Full stack best Practices
- Web Experience Best Practices
- Web Experience Design Best Practices
- Decision Model Best Practices
- Batch Flow Best Practices
The following testing and troubleshooting guides in the knowledge hub provide useful information and steps on how to troubleshoot when implementing various features:
- Full Stack Testing and Troubleshooting
- Testing and Troubleshooting Web Tagging
- Testing Experiences and Decisions for expected behavior
- Troubleshooting programmable decisions
- Decision Models Testing and Troubleshooting
- Testing triggered experiences via endpoint
They are in process of migrating docs to Sitecore, you will run into broken links referring to the old docs site within some of the documents. To get around this best method I have found is searching for documents via link title or text.
Besides the documentation, there is also a slack channel available for additional information and support from the community.
How to get Sitecore CDP running on a site
Sitecore CDP uses a JavaScript library to integrate CDP features on a site. The script can be added to your site either by embedding it on the clientside using Google Tag manager or server-side scripting. The following guide is useful in helping you understand the various integration options.
Before tagging your site with the Boxever JavaScript library you are going to need the following pieces of information:
- clientKey – Obtain this from System Settings -> Api Access -> Client Key
- apiTargetEndPoint – the API target endpoint is specific to your data center region there are three possible options. An easy way to determine which one you should use is to look at the URL of your Sitecore CDP platform. If your platform is located in Europe it will have the following url: app.boxever.com and if it is in the US it will be app-us.boxever.com. These usually depend on the clients requirements and are defined during the project setup.
- Europe: https://api.boxever.com/v1.2
- Asia Pacific: https://api-ap-southeast-2-production.boxever.com/v1.2
- United States: https://api-us.boxever.com/v1.2
- cookieDomain – the top level cookie domain of the website that is being integrated e.g “.example.com”
- clientVersion – the JS Library Release Notes provides the available versions that can be used.
To activate the JS Library on your web pages copy and paste the following snippet on your site replacing {{clientKey}}, {{apiTargetEndpoint}}, {{cookieDomain}}, and {{clientVersion}} attributes with your own values.
<script type="text/javascript">
    // Define the Boxever queue
    var _boxeverq = _boxeverq || [];

    // Define the Boxever settings
    var _boxever_settings = {
        client_key: '{{clientKey}}', // Replace with your client key
        target: '{{apiTargetEndpoint}}', // Replace with your API target endpoint specific to your data center region
        cookie_domain: '{{cookieDomain}}' // Replace with the top level cookie domain of the website that is being integrated e.g ".example.com" and not "www.example.com"
};
    // Import the Boxever library asynchronously
    (function() {
         var s = document.createElement('script'); s.type = 'text/javascript'; s.async = true;
         s.src = 'https://d1mj578wat5n4o.cloudfront.net/boxever-{{clientVersion}}.min.js';
         var x = document.getElementsByTagName('script')[0]; x.parentNode.insertBefore(s, x);
    })();
</script>
When you place the script on your site the following occurs:
- The tag loads the .js client from the Sitecore CDP CDN.
- The .js client assigns a cookie to the user using the Browser API.
- The tag captures behavioral data from the website.
- The tag sends behavioral data to the Event API using the .js client.
- The tag requests personalized content from Flow Execution API using the .js client.
Once tagged you can send various events to Sitecore CDP. You can verify it is working by viewing events in Sitecore CDP. If you run into issues ensure you do not have an add-blocker running as that can prevent direct client-side integration. Check the browser console for any errors being returned and consult the troubleshooting guides linked to above.
Cookies
The Sitecore CDP sets a number of first-party cookies when a visitor lands on your site. Each cookie differs in its purpose and expiry date. While Sitecore has rebranded Boxever they have not updated the names of the cookies that is why you’ll see Boxever appear in your list of cookies.
- bid_{clientKey} – cookie persists the browser ID between sessions. It generates a Universally Unique Identifier (UUID) that is unique per browser until the cookie expires or is deleted, then a new UUID is generated. Boxever data capture cookies expire after two years of inactivity. You can use this for locating the guest by entering bid: value in the search box.
- bx_bucket_number – is only used if your organization has at least one Web Experiment enabled on your site. This cookie allocates the Guest to a specific variant. It performs allocation for each Web Experiment that is live on your site during the particular session. This session cookie is only stored for the duration of the session.
- boxever_test – cookie checks that the other cookies are working as expected, then is immediately removed from the visitor’s device.
REST APIs & Postman
Sitecore CDP provides a suite of REST APIs that enable you to locate, create, update, retrieve, and delete data. There is no OpenAPI document describing the API endpoints so you need to create the requests manually. Alternatively, you can use the Postman Collection I’ve created which you can get here.
Sitecore CDP supports basic authentication. An API token is a unique key that Sitecore provides your organization to authenticate your services.
You can obtain your client key and API token from Sitecore CDP, in the navigation pane, click System Settings -> API Access. For basic authentication:
- Username = Sitecore CDP apikey.id
- Password = Sitecore CDP apikey.secret
Debug Mode
Probably the first thing you will want to do as a developer using Sitecore CDP is to enable the debug mode. Enabling the debug mode will give you access to additional information about the requests received.
To enable click on the Sandbox in the bottom left corner -> Your Profile -> Feature Flags -> Enable Debug flag. The features will vary on your account privileges.
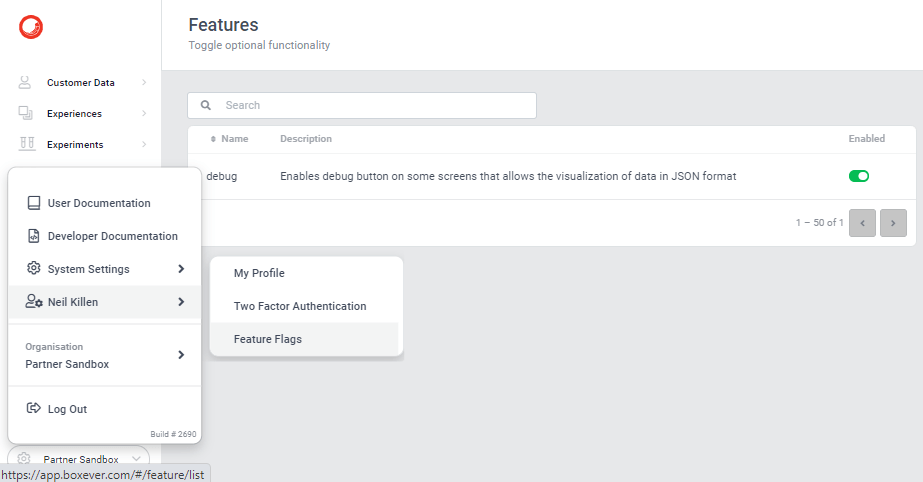
Once enabled you will see a cog appear in several locations, for example:

Clicking the clog will give you access to more information stored and is useful for troubleshooting.

FreeMarker
FreeMarker is a template engine, written in Java, and maintained by the Apache Foundation. It is used by Sitecore CDP when constructing templates.
While it is not a difficult language to master you will benefit greatly by taking a crash course to familiarize yourself with its structure as you will be using it a lot when constructing templates.
A template constructed using FTL (Freemarker template language) and can consist of the following elements:
- Text – regular text which will be printed as output.
- Interpolations – These sections will be replaced with a calculated value in the output. Interpolations are delimited by ${ and }. Sitecore allows you to drag CDP data models fields and drop them as interpolations when editing a template.
- FTL flags – these are a bit similar to HTML tags, but they are instructions to FreeMarker and will not be printed to the output.
- Comments – similar to HTML comments, but they are delimited by <# – – and – -> and are ignored.
FTL is case-sensitive. It is used pretty much everywhere where you need to construct an output or a response from the platform. For example the following areas of the platform:
- API Response in Web Experiments
- API Response in Interactive Experiments
- Creating Web and Offer Templates
While the platform does provide some useful snippets having a firm understanding of the language will benefit you greatly. This Quick Overview cheatsheet is a handy reference.
Useful links
- How to choose a CDP
- What is CDP
- Introduction to Experiments
- Freemarker
- Freemarker Cheatsheet
- Glossary of terms
- Using Sitecore CDP REST APIs
- Integrate Sitecore CDP using JavaScript
- Tracking visitors and their interactions on the web channel
- Introduction to Sitecore CDP REST APIs and my Postman Collection
Have fun with Sitecore CDP/Personalize!
