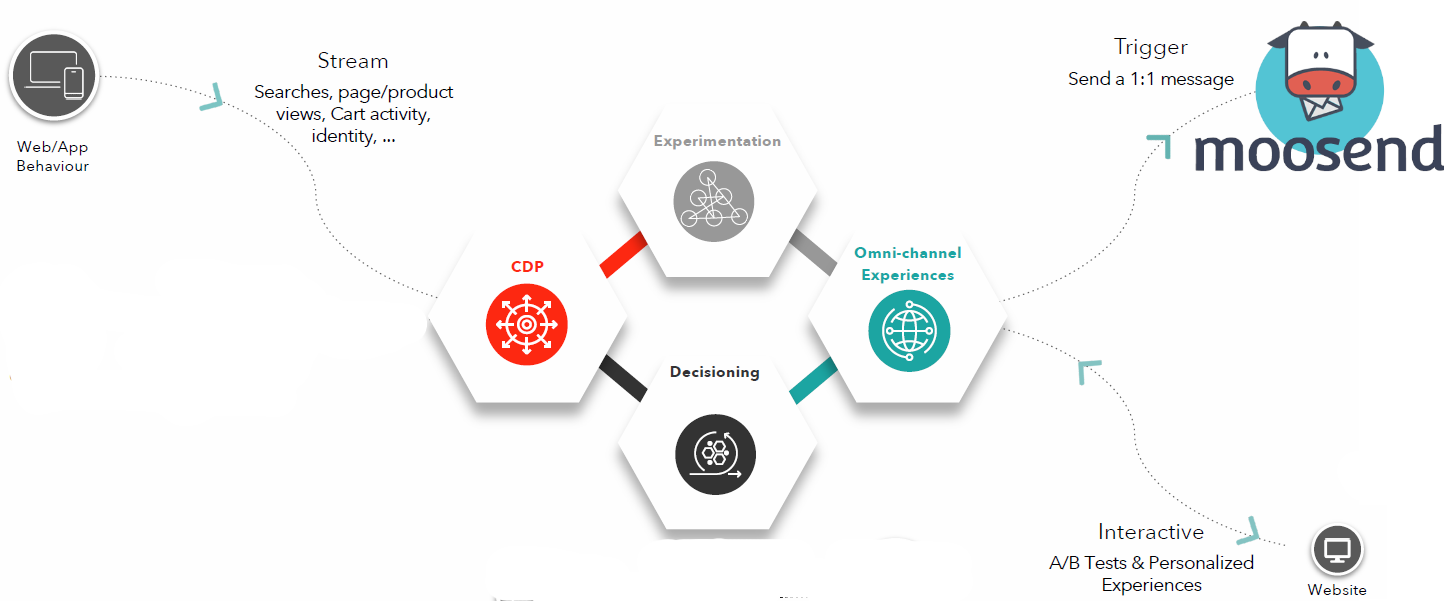
Lead generation is such an important marketing practice for every business or brand and it comes in many different forms. Take the simple subscribe to receive discount offers email, almost every e-commerce site I’ve landed on recently has displayed one of these pop-ups. Sitecore Personalize makes it possible for your marketing team to easily add these lead generation experiences. While Sitecore Send (Moosend) allows marketing to stimulate and nurture visitor engagement through targeted and relevant communications. With the ultimate goal of converting visitors into lifelong consumers.
In a previous post, I showed how to easily integrate Sitecore CDP/Personalize with your existing site using GTM. In this post, I’ll show you how to capture the visitor’s name and email address using a Sitecore Personalize web experience, once a guest submits their information we’ll add them to a mailing list configured in Sitecore Send (Moosend).
To achieve this we will complete the following:
- Create a offers mailing list in Sitecore Send (Moosend) for customers so they can subscribe to receive offer emails.
- Take a look at the Sitecore Send REST API we will use to add a user to the mailing list.
- Create Data Connection in Sitecore Personalize for the API method.
- Create a Web Experience prompting user to enter name and email to subscriber to the email campaign that only displays when user has not previously subscribed.
- Create a Triggered Experience that will send user data to Sitecore Send using a data Connection to subscribe the user to the mailing list when the user submits the subscription pop up.
- Start the Experiences and Test.
At first glance, this might seem like a lot of steps to go through but it’s relatively straightforward to accomplish with Sitecore Personalize and Sitecore Send. Once you understand the various components involved, which I’ll guide you through, your marketing team will be able to re-use for similar scenarios.
Lots of good stuff!
Sitecore Send (Moosend) quick intro
If you are not familiar with Sitecore Send (Moosend) it is an email marketing platform that automates repetitive tasks, so marketers can focus on building client relationships. It has an intuitive interface for designing emails and measuring campaigns without coding or web design experience needed. Sitecore Moosend currently offers three plans Free, Pro and Enterprise, so you can sign up for a free account today and go check it out.
My friend Miguel Minoldo has written an excellent series to help you get started with Moosend, I highly recommend checking these out:
- A first look at Moosend
- Mailing Lists, Custom Fields and API Integration
- Campaigns, Automation, Templates, Designer and Subscription Forms
1. Create a mailing list in Moosend
To create a mailing list in Moosend is pretty straightforward just follow these simple steps:
- Once logged in from the navigation tab on the left select Mailing Lists option.
- Once inside Your Mailing Lists, click on the Create new list button at the right top corner.
- Fill in the Mailing List Name field and click Save.
- Your new mailing list will be created with a unique identifier – we will need this later.

2. Sitecore Send REST API’s
You can easily subscribe users to a mailing list within the Sitecore Send interface, however, we are going to do it programmatically using REST API. The API enables you to easily integrate other applications in your Composable DXP and access the following features:
- Mailing Lists – create new lists, subscribe new users to your existing lists, manage segments and create or delete custom fields. Fetch mailing list statistics.
- Subscribers – add or remove mailing list subscribers, fetch and update their information and batch import new subscribers.
- Campaigns – create, schedule and send new campaigns, or update information on your draft campaigns. Fetch campaign statistics.
- Segments – allows you to retrieve or count mailing list members based on given criteria.
While the Moosend Apiary console is a handy tool I prefer to keep all my REST API requests in a single location that is why I created a Moosend Postman collection which you can get a copy of here.
Adding Subscribers Method
To add a user to a mailing list we will use the Adding Subscribers API method to add a new subscriber to a specified mailing list. If there is already a subscriber with the specified email address in the list, an update will be performed instead.
api.moosend.com/v3/subscribers/{MailingListID}/subscribe.{Format}?apikey={your api key}
- MailingListID – the id of the Mailing list we created easily obtained from Sitecore Send.
- Format – allows you to specify the format of the response.
- apiKey – you own unique Sitecore Send private key.
- Body – is where we specify the subscriber details i.e name and email are all we require.
Sample request in postman:

3. Create Data Connections in Sitecore Personalize
Sitecore Personalize enables you to create reusable data Connections to pull data from external 3rd party systems, or use AI modeling in your business decision models. You can also push data to other systems like an email marketing platform.
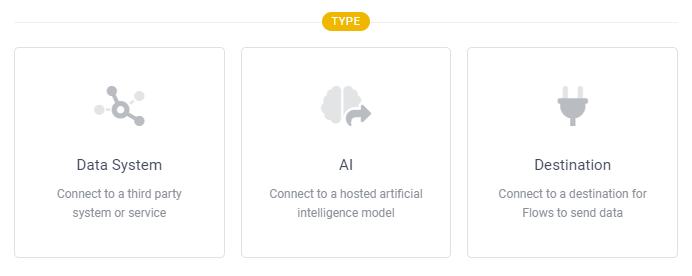
We will create a new Destination connection to call the add subscriber REST API. After clicking create connection and selecting the type the Create Connections wizard will prompt you to complete the following steps:
Step 1 – Name & Description
Name: Give your Data Connection an appropriate name preferably one that best describes the service and method: SitecoreSendAddSubscriber
Description: Adds a new subscriber to the specified mailing list. If there is already a subscriber with the specified email address in the list, an update will be performed instead.

Step 2 – Authenticate
Sitecore Send API authentication is achieved through the use of an API key. The API key must always be specified as a parameter in the query string of the requesting URL. So we will select no authentication as we will specify it as a param when we configure the request.

Step 3 – Request
Here we can configure the request url and any parameters, request headers and connection timeout. We can also test the request and verify the response.
- Request URL: api.moosend.com/v3/subscribers/[your mailing list Id]/subscribe.json?apikey=[your unique apikey]
- Tip: Parameters can be included in the URL using the freemarker format enclosed in ${}.
- Connection Timeout – defaults to 1000 milliseconds.
- Headers – you can leave the default settings. You also have the ability to include additional headers.
- Read timeout – defaults to 1000 milliseconds.
- Request body – provide the body of the request. We will construct this temporarily for testing and pass it through when the user subscribes. More on this later.
- Response – response is displayed when you test your connection.
- Test Request – To test the connection click Test Request you’ll be prompted for any parameters values and the results are shown with the relevant status code.

TIP: You need to test the request before you can progress to Map and finally save the connection.
Step 4 – Map
Here you can configure any input or output parameter configurations that will be used.

Step 5 – Review & Save
Now we just need to review the details to ensure everything is configured as expected and save.
Tip: Once you save you will not be able to make changes to this connection so it’s important that you ensure it is configured as expected. Otherwise, you will need to recreate the connection, which you can do by duplicating the existing connection, modifying it, and then deleting the old connection.
4. Create the Web Experience
To create a Subscribe to Offers popup Web Experience select Experience -> Web -> Create Experience
Step 1 – Add a Template
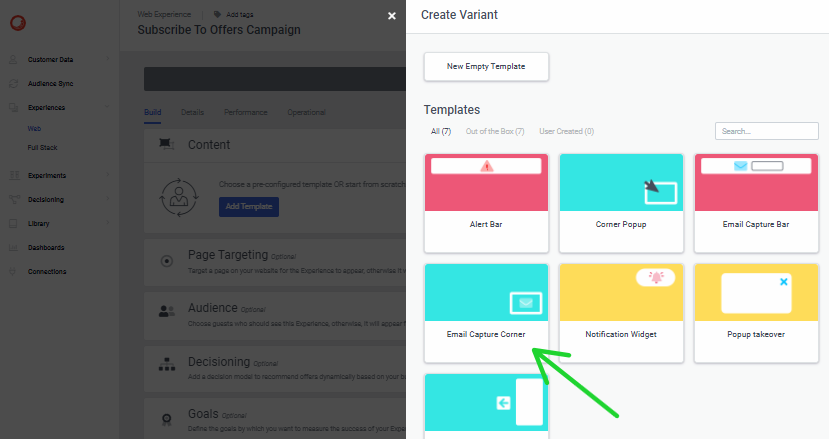
We will use the OOTB Email Capture Corner web template as our base template and make the following modifications:
- Add First Name and Last Name to the HTML tab to allow visitors to enter their name along with the email address.

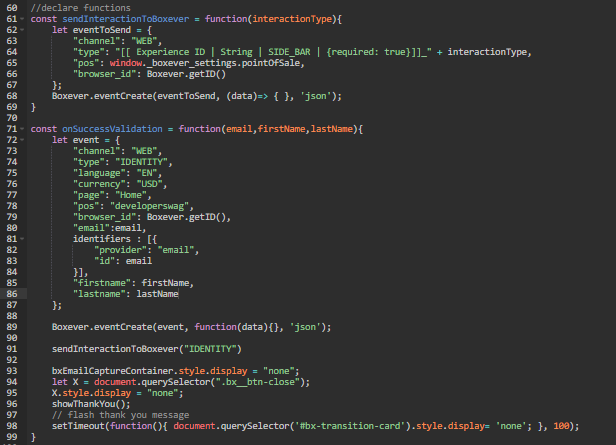
- On the Javascript tab modify the existing JavaScript methods to include these new field values as part of the Identity Event sent to Sitecore CDP. This method will convert the visitor to a customer in Sitecore CDP.
- We will send a custom event: “SUBSCRIBE-TO-OFFER-IDENTITY” to Sitecore CDP, this event will be used to triggered the Add Subscriber data connection sending the users information added to Sitecore Send. Note the Experience ID of my pop-up template is SUBSCRIBE-TO-OFFER.
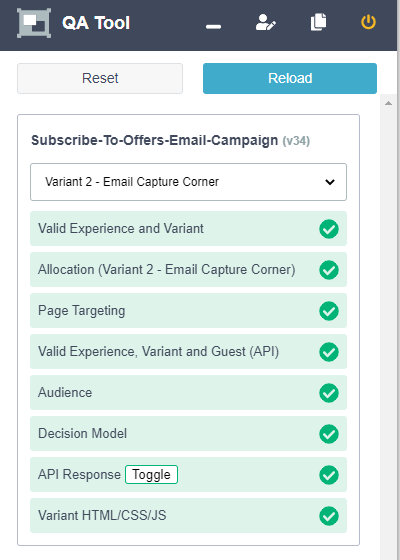
- We can Preview the offer pop-up and ensure there are no issues reported in the CDP preview QA tool. If everything is good we can proceed.
TIP: Sitecore CDP makes it really easy to create reusable Web Templates for your marketing team. So when creating a template think about the content on that template your team may want to change. As CDP makes it really easy to create configurable parameters using their template parameter syntax that can easily embed values within the HTML and CSS etc. Allowing for templates to be easily repurposed.
Step 2 – Add Page Targeting
We want to ensure our pop-up only appears on my demo site’s home page. On the page targeting section click Add. In the modal, we can define one or more conditions for where on our site we want the pop-up to appear.
- Match On – you can select your operator.
- String – enter the string value of your url you want to match on.

Advanced targeting – enables you to have Client-Side JavaScript (CSJS) executed on the browser to determine when to execute the experience. This could be on a page close or scroll event, examples of these events can be found in this git repo. So if you wanted to add some timings i.e. show the pop-up after x seconds this is where you would do it.
Step 3 – Add Audience
We only want our Web Experience to display for those Guests that have not already subscribed to our campaign. As we want to avoid irritating the user if they have already subscribed. To do this we will add an Audience. Click Add on the Audience section of the web experience build tab. You will be presented with the following modal:
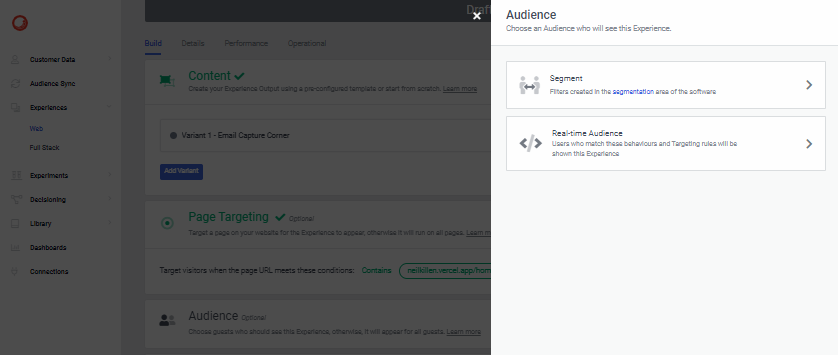
So we have a few options on how we can target a specific audience:
- Segment – you can define a segment of vistors and target that segment.
- Realtime Audience – using JavaScript to define conditions that are run in real-time against a guest’s current online behavior. If the conditions return true, the experience runs.
- Apply Audience Template – is saved JavaScript that can be reused and apply them to numerous experiences. So if your marketing team isn’t that familiar with writing JavaScript these templates could be created and managed by your developers and then reused by marketing.
I added a real-time audience JavaScript to check if the guest has any sessions and if any of those sessions contain the custom event: “SUBSCRIBE-TO-OFFER-IDENTITY”. If the event exists we return false and the pop-up is not displayed. Otherwise, return true and it is displayed. This could easily be converted to an Audience template and made re-usable by making the event type configurable.

With that our Web Experience is complete. However, if you were doing this in Production you would also add a Goal, which I’ll cover in more detail in another post.
Tip: You can test using Preview and try it out with different guests. The QA Tool will let you know if the Audience filter returns true or false.
5. Create a Triggered Experience
In order for us to send the captured info to Sitecore Send, we use a triggered experience. This will be fired when the user triggers the custom event: “SUBSCRIBE-TO-OFFER-IDENTITY” and will call the data connection and pass the user’s name and email in the body.
Step 1 – Create triggered experience
Create a new Triggered Experience select Experience -> Fullstack -> triggered. Choose the data connection SitecoreSendAddSubscriber.

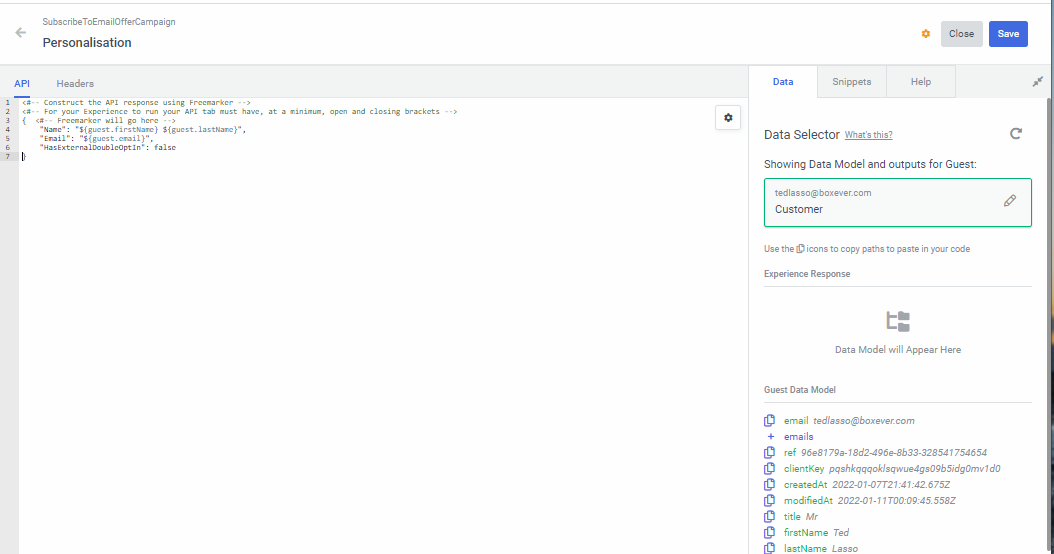
Step 2 – Define Body
To define the request body json for the data connection. You can select the fields from the guest data model on the right after you have selected an existing guest user. Simple copy path as freemarker and paste the value into the API tab to construct the request body. Once complete click Save.

Step 3 – Add Trigger
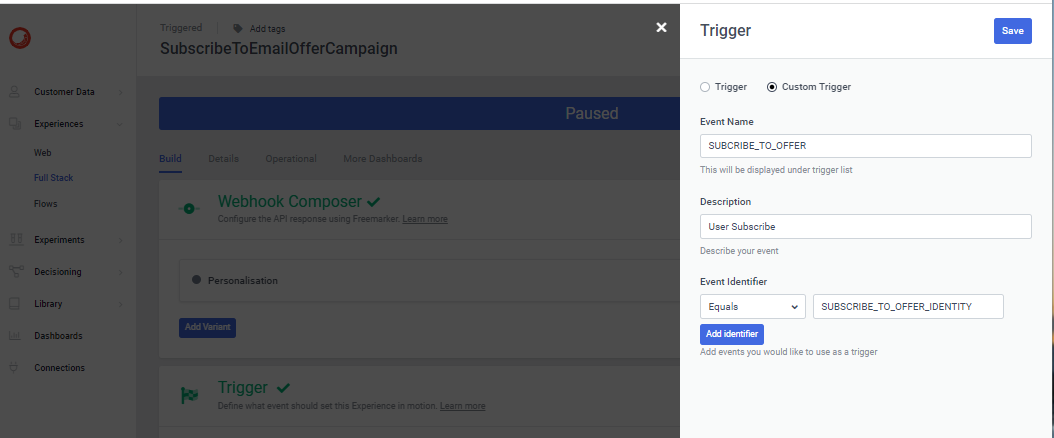
Next, we will define the trigger. Click on the Add Trigger and populate the trigger fields:
- Type: custom event
- Name: SUBSCRIBE_TO_OFFER
- Description: User subscribe to offer event
- Event Identifier: Allows you to define the condtion that triggers the event. Here I choose the operator: Equals. We will enter the string value of the custom event we passed in JavaScript method when the user entered their details and submitted the pop-up: “SUBSCRIBE_TO_OFFER_IDENTITY”.
Tip: This rule must match the value of the event sent to Sitecore CDP in the offer pop-up.
6. Start Experiences, Test and Review
Now we can start both the Full Stack Triggered and Pop-up Subscribe Web Experiences. Once started I can browse to the site and I should see the Subscribe to Offer pop up.

After I’ve completed the form I can check Moosend using the Get Subscriber by email address method in Postman by including my email address and the MailingListID in the request, to see if the user has been added to my mailing campaign. WHOO HOO!

When the experiences are running you can review the Operational Tab within the experience and it will provide you the Success, Failures rates and reporting.


If we check the Customers Data tab we can verify the Guest type is now a known Customer. Yey! The Guest timeline tab provides a handy view of all the guest’s interactions with your site.

Useful Info
- Moosend API
- Creating an Email Campaign
- It’s all about connections
- Identifying guests in Sitecore CDP
- Send Custom Event to Sitecore CDP
- Introduction to triggered experiments
- Compose webhook for a triggered experiment
- Compose API Response for a triggered experiment
- Creating a Postman Collection For Sitecore Send (Moosend)
Have fun exploring Sitecore’s new products, if you have any questions get in touch!
