I recently presented at Atlanta Sitecore Usergroup and gave a demo using Data Exchange Framework (DEF) 2.0 and the SQL Provider – to read customer records from a SQL table and create items in Sitecore. You can read more about the DEF 2.0 here. In this follow-up post, I’ll walk through the DEF configuration required for the demo.
The data
So we know the source system is SQL and data lives in the customer table of the Northwind database:

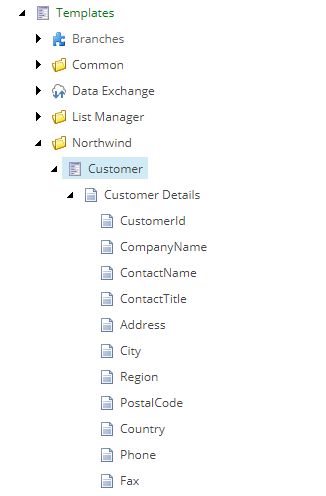
We want to load this into Sitecore so we will need a template for the customer records in Sitecore – this will be our target item.
We also need a location to store these items when they are loaded into Sitecore. I’ve just added a new folder to the home node called Customers. This probably should be a bucket and the customer template bucketable but this will do for now.
So we have our Source data and our Target item and a location in Sitecore where we want to load this data.
Data Exchange Framework
I’ve downloaded the DEF 2.0, Sitecore Provider and SQL Provider packages from Sitecore and installed these into my Sitecore 9 instance. Next we need to configure our DEF for our integration.
Create a New Tenant
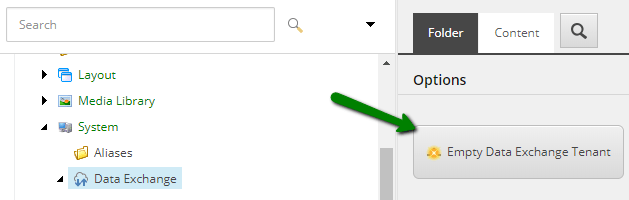
In the Content Editor I can navigate to the Sitecore > System > Data Exchange here I have an insert option to create a new Empty Data Exchange Tenant. I’ll add a Tenant and call it SQL Provider Northwind Tenant.
Configure Endpoints
Next, we need to specify the endpoints.
- Navigate to Sitecore -> System -> Data Exchange -> SQL Provider Northwind Tenant -> Endpoints -> Providers again you will see the option to insert Endpoints based on the providers you have installed.
- From the insert options I will add an SQL endpoint and call it SQL Northwind. Next I need to configure this to talk to our Northwind SQL database.
- Before I can configure the SQL Endpoint I need to add a new connection string to the ConnectionStrings.config file for the Northwind database. Which I have already done and called it Northwind.
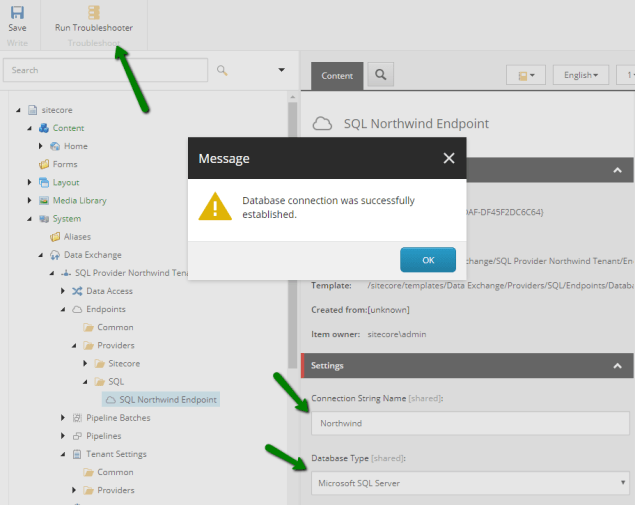
- Now I can configure the settings for the SQL endpoint:
- Connection String Name: set this to Northwind
- Database Type: Microsoft SQL Server.
- There is a cool feature on the ribbon that allows you to test your endpoint connection by clicking on the button Run Troubleshooter this will test the connectivity to the database. NICE one Sitecore!!
- We also need an Endpoint for Sitecore but we just have to add the Sitecore Endpoint from the insert options no configuration is required.
- That’s the endpoints configured.
Configure Tenant Settings
We need to tell the tenant about the providers we want to use and the data we are going to consume.
- To do this expand the new tenant and navigate to Tenant Settings > Providers, here you have insert options to add settings for the various providers you have installed.
- As the source system is SQL I have added a SQL Tenant Settings this will allow me add a SQL database and define the tables and/or stored procedures that I want to read/write for this particular tenant.
- So now I will go ahead and define the SQL objects navigate to Tenant Settings > Providers -> SQL add a new SQL database from the insert option and call it Northwind.
- Select the database Tenant Settings > Providers -> SQL -> Databases -> Northwind now I can add my table you could also add stored procedures if that you wanted to obtain your data that way. I added a new table called Customers.
- Now I need to define all the columns in the table that I want to read from this is done by adding each column individually and specifying its data type using the SQL Database Table Column insert option.

- The SQL Provider currently only supports columns of data type: string, GUID and int32 if you need additional data types you will need to extend the provider.
- That’s it with defining our source provider in tenant settings.
Configure Value Accessor Sets
Next, I need to define the Value Accessors Sets that will model our source and target objects. You can think of these as property getters and setters in a C# class – they act as an abstract layer that can be passed between the context processors in the pipelines steps I will define later.
- Navigate to Sitecore -> System -> Data Exchange -> SQL Northwind Tenant -> Data Access -> Value Accessor Sets -> Providers in the insert options you can create accessor sets for the various providers you have installed. I need to create the accessor set for the source system SQL and the target system Sitecore.
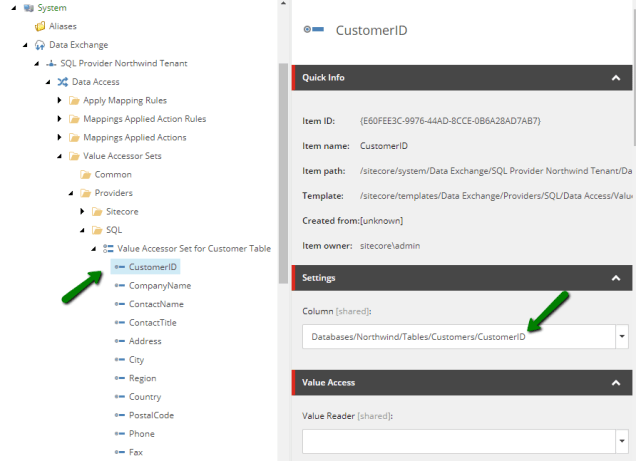
- In the insert options select SQL Value Accessor Set and give the set a name for example Value Accessor Set for Customer Table this will add a new node to Providers -> SQL.
- For each field in the Customer Table I need to add a Database Column Value Accessor. In the settings section of each value accessor item select the corresponding column from the Customer table that was defined in the tenant settings.
- Now I need to add the Sitecore Value Accessor – navigate Values Accessors Sets -> Providers node and Select Sitecore Value Accessor Sets and give the set a name Value Accessor Set for Customer Item.
- For each field in the Sitecore Customer template I need to add a Sitecore Item Field Accessor and configure it by selecting the corresponding field in the Sitecore Customer Template item I created earlier.

- The DEF is pretty good at limiting the values you can actually choose from, guiding you towards the correct field based on the type of item you are working with. Kudos to Sitecore – they have put some thought into making the configuration process of easier, quicker and less prone to error.
Configure Value Mapping Set
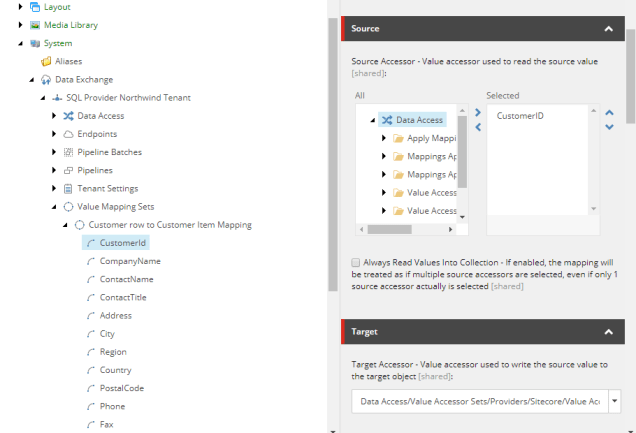
Value Mapping sets allow you to define the mappings between a source object and a target object. You can also define mapping rules and apply a transformation to the data before and after the mapping occurs. Here I have added a simple straight mapping set for each source value to its target value. For each Mapping you need to configure:
- Source Accessor – Value Accessor used to read the source value.
- Target Accessor – Value Accessor used to write the source value to the target object.
Configure Pipelines
Now we get to have some fun and define the actual process and steps required to read the customer data from the SQL table, map it to a Sitecore item and create a Customer item in Sitecore in the Customers folder for each record in the SQL Customers table.
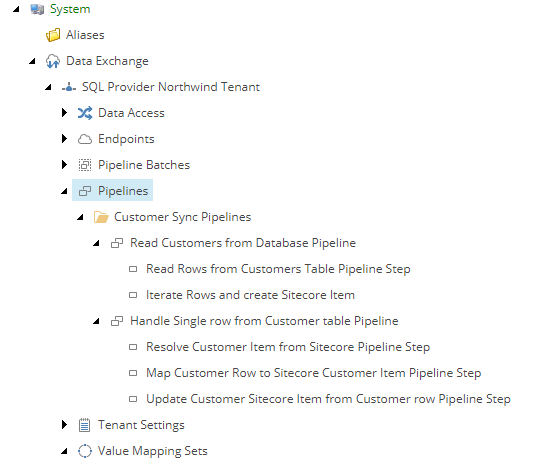
- Navigate to Tenant -> Pipelines I will add a Pipelines Folder called Customer Sync Pipelines in here we will all add the various pipelines associated with syncing our customer data. Folders help add some structure and order to the pipelines configuration.
- The first pipeline is going to read the customers for SQL database – so I have added a pipeline called Read Customers from Database pipeline. Then I will define all the various steps required to read the data.
- The first pipeline step we need is one that will to read the SQL Customers Table. All the available pipeline steps are listed in the insert options for the pipeline note: The more providers you have installed the more pipelines steps will be available. To read the data I will add the Read Database Table Data Pipeline Step and call it Read Rows from Customers Table pipeline step. This now needs to be configured:
- Endpoint From: SQL/SQL Northwind endpoint
- Table: Databases/Northwind/Tables/Customers
- Max row count: allows you to define the maximum number of rows to read – this is useful if you want to limit the number of records you read in especially handy when testing your integrations.
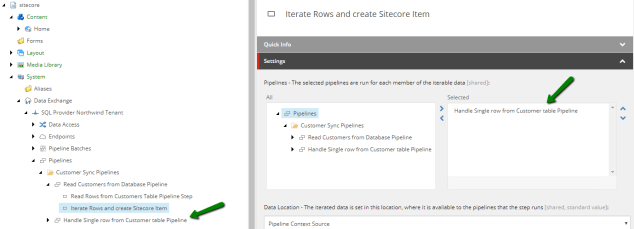
- With the Customer data read and added to the Context I need to iterate over each row. Guess what there is a pipeline step to handle that called Iterate Data and Run Pipelines pipeline Step – this will iterate the over each row and pass a single row in Context to another Pipeline for processing. For this step we need to configure the following:
- Pipelines – Select the pipelines that are run for each row. We have not yet defined the pipeline for creating the Sitecore item so we will have to return and set this value once we’ve created it.
- Data location – this is the context where the data exists we will set this to the Pipeline Source Context.
- I need to create the Pipeline to handle a processing of a single row from the Customer Table and create a new Sitecore customer item. I’ve added a new Pipeline called Handle Single Row from Customer Table Pipeline. Once this is added I can go back and complete the configuration of the pipeline on the Iterate Data and Run pipeline step.
 Let’s pause and think about what this new handle single row pipeline needs to do:
- it needs to check if the item already exists in Sitecore
- if it does exist update it
- if it does not exist create it
- it also needs to map the Customer row to a Sitecore Customer Item
- The first step I am going to need is the Resolve Sitecore Item Pipeline Step. As the name suggests this will check if an item exists or not. So I need to configure everything you think would be involved in locating an Item in Sitecore:
- Template for the new item: Templates/Northwind/Customer
- Item Name Value accessor – Value Accessor used to determine the name for the new item: Data Access/Value Accessor Sets/Providers/SQL/Value Accessor Set for Customer Table/Company Name
- Endpoint From – Endpoint to read data from: Sitecore/Sitecore Item Endpoint
- Identifier Value Accessor – Component used to read the identifier value: Data Access/Value Accessor Sets/Providers/SQL/Value Accessor Set for Customer/CompanyID
- Identifier Object Location: Pipeline Context Source
- Resolved Object Location – The resolved object is set in this location where it is available for subsequent pipeline steps: Pipeline Context Target
- Parent for Item – Parent for the item to resolve: Sitecore/content/Home/Customers
- Matching Field Value Accessor – Value Accessor for the Sitecore item field used to match the identifier value: Data Access/Value Accessor Sets/Providers/Sitecore/Value Accessor Set for Customer Item/CompanyId
- So at the end of the previous step I will have an item loaded into pipeline context as the target object this will either be an existing Sitecore item or a new Sitecore item. The next thing I need to do is the transformation step. This will take the values from the Customer Database row and set those values on the new Sitecore item or update the existing item. I will add another pipeline step Apply Mapping Pipeline Step – and call it Map Customer Row to Sitecore Customer Item and apply the following configuration:
- Mapping Set – select the mapping set we defined in mapping: Value Mappings Sets/Customer row to Customer Item Mapping
- Actions – you can apply actions if the mapping set is applied successfully: we will leave this blank.
- Source Object Location: Pipeline Context Source
- Target Object Location: Pipeline Context Target
- All that is left to do is save our item – add a pipeline step Update Sitecore Item Step. There is very little to configure here:
- Item Location: Pipeline Context Target
- Endpoint To – Endpoint for the Sitecore item model repository: Sitecore/Sitecore Item Endpoint
- That is all the pipelines and pipeline steps we need to define to be able to read the records from the Customer table, process each record and create an item in Sitecore.
Note the order of the pipeline steps does matter as they will process sequentially. The order of the pipelines does not really matter but it is good practice to place them in the order they occur – as this makes it easier to read. This is a very simple process but you could have a more complex process with a lot more pipelines.
Pipeline Batch
The Pipeline Batch allow us to run our pipelines.
- To create a Pipeline Batch navigate to the Tenant -> Pipeline Batches and select Pipeline Batch from the insert options I have created one called SQL Customers to Sitecore Customers Sync process.
- To configure the pipeline batch you only need to set is the pipeline the pipeline batch will start. I’ve set it to my pipeline Read Customer from Database Pipeline.
- To run the Batch you can Click on the Run Pipeline Batch button on the ribbon.
- If the Button is disabled this is because the Tenant by default is disabled and needs to enable it. This prevents you from running it accidentally during the configuration. Select the Tenant and check the enabled option.

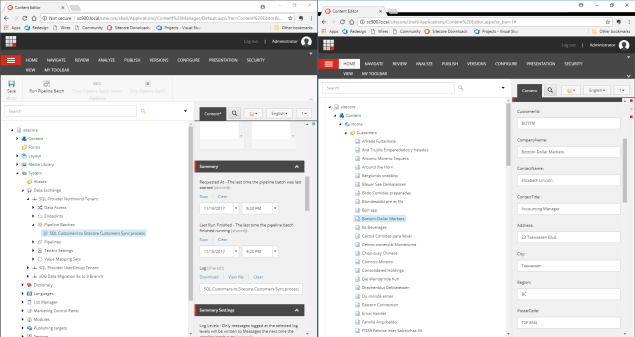
- While the Pipeline Batch is running the Show Pipeline Batch Status button is enabled and you can click on it to view the run status of the batch or cancel the batch from running. Once the Batch is complete you can view summary on the pipeline batch.
- If we look at the Customers folder in Sitecore the Customer items have been created.

Pipeline batches can also be run as a Sitecore scheduled tasks or the could even be started remotely by another system or a Windows task using the Data Exchange Framework Remote SDK.
While this is a very basic example of what you can do with DEF SQL Provider, I hope you have found it useful. I encourage you to take DEF and SQL provider for a spin as I found it really helpful in understanding the concepts and patterns of the DEF.

3 thoughts on “Sitecore Data Exchange Framework the SQL Provider”