Earlier this year I took part in a Social Impact Hackathon organized by Valtech, CreateLabs, Contentful for the Henry Street Settlement in NYC. During the event I introduced OBS (Open Broadcaster Software) and shared some handy tips on how to get started using this awesome tool to improve your video content and/or presentations and client demos. I’ll share some of those tips over a series of posts starting with a quick intro.
What is OBS?
OBS is an open source video production and streaming application with a large community of developers. It can help you produce better quality recorded video and/streaming video content.
How could you benefit from using OBS? During the pandemic just about everyone has become familiar with video steaming services. Social distancing and lockdowns caused an unprecedented number of people to working or studying from home making services like zoom a household name in 2020.
This increased popularity of streaming video pointed out noticeable differences in quality. With the more professional-looking, having multiple camera angles, titling, effective lighting and crisp audio, VS other video streams consisting of one or more talking heads and poor audio. What’s the difference? Well it’s not exactly difficult to record and share a video of yourself these days. Most people can do it directly from their phone or laptop webcam. However, to produce professional looking recording requires a bit more time, and effort and some decent software to enhance the quality of your recording. That’s where OBS comes in as it can help make improve the quality of your video recordings, and presentations in general.
On my current Sitecore project our development team have adopted OBS to create short recordings to showcase each feature they have completed in the sprint. These are attached to the user story and then used in after Sprint Demo to showcase to the BA, QA and the client what has been completed in the sprint and how the new feature functions. This has the following benefits for the entire team:
- Developer – this acts as a confirmation check as they read through stories acceptance criteria and as part of the as part of the recording prior to demoing the feature. This helps confirm feature has indeed been implemented according the defined Acceptance Criteria and identifies any short comings or issues. Which can then be addressed. Developers gain confidence in creating recorded presentations. We’ve also found developers gain confidence and those that might be slightly introverted can significant confidence and are less intimidated presenting in front of the client. Prevents developers simply throwing features over the wire to QA without ensuring it functions as expected – not that they would.
- BA – This helps solidify features have been implemented according the Acceptance Criteria and identify any short comings or issues.
- QA – They can see exactly how a feature has been implemented, how to test it and where to go if they need to configure or change anything in Sitecore. Reduces the amount of communications back and forth.
- Program Management – gain confidence in what is being delivered and the quality.
- Client – They can see the progress without waiting for it to go through QA. Reaffirms that the feature functions and is designed as they had anticipated and provides an opportunity to provide feedback earlier in the lifecycle. Also as its recorded and attached to the user story so it can be re-visited when they start their UAT testing or if someone is unable to attend the after Sprint Demo meeting.
Getting Started
To get started with OBS head over to www.obsproject.com and download the supported version for your OS (Windows, Linux or Mac). Once downloaded fire it up and you should see the following user interface:
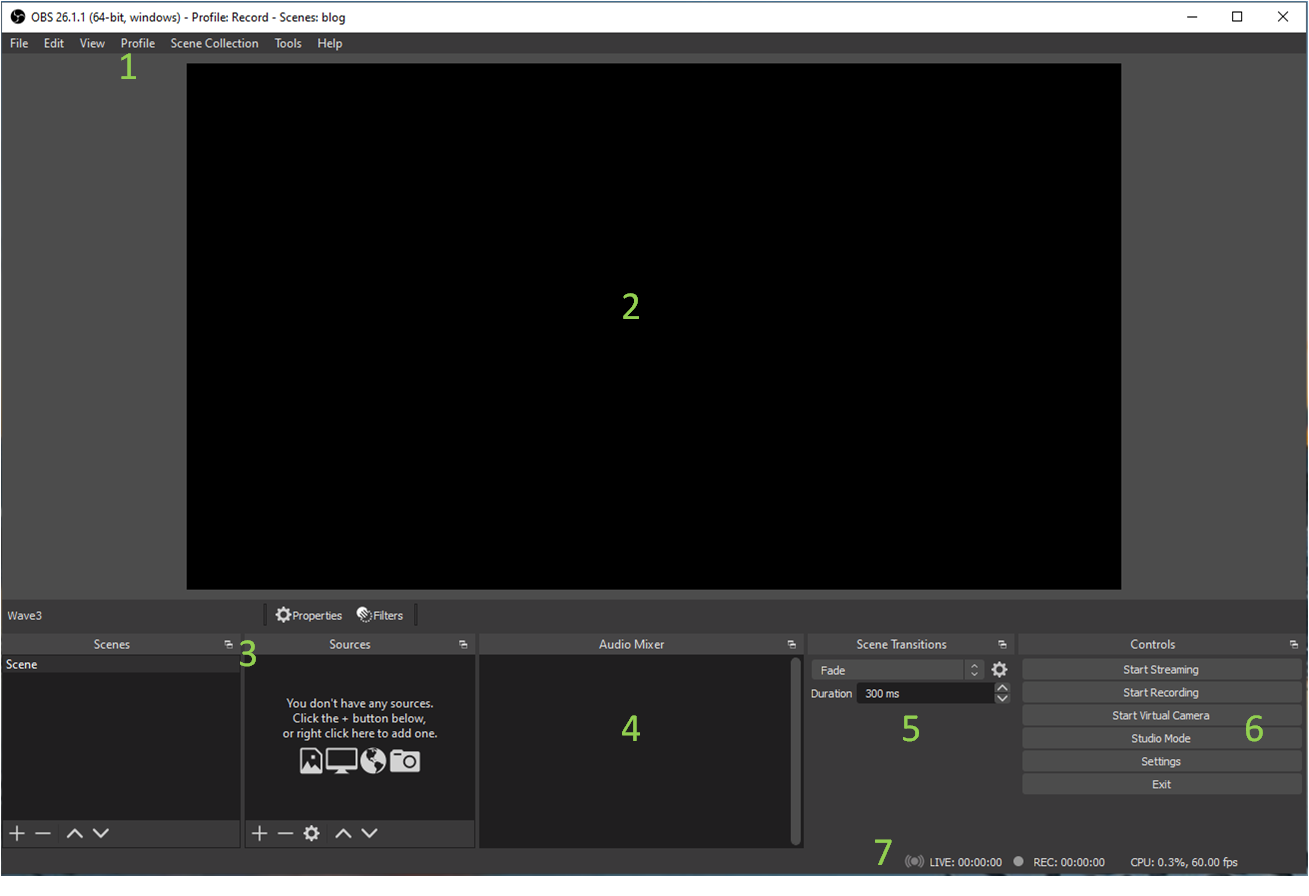
Let me quickly describe the various components of the interface to help you understand what they are used for.
1. The Menu Bar includes “File, Edit, View, Profile, Scene Collection, Tools and Help” menus. The Profile and Scene Collection are really useful.
- Profiles – allows you to setup different settings for OBS and save it. This allows you to have different configurations say for recording or live streaming.
- Scene Collection – allows save different Scenes & sources and their settings again you might want to change these depending on the different kind of project or scenario you are working on. So rather than have a project you utilize Profiles and Scene collections to configure you OBS Setup depending on your current scenario
2. In the Centre you have the main preview window. Whatever is being shown here is what you are recording or streaming.
3. At the bottom left you The Scenes and Sources this is where you setup your stream by adding different sources.
Sources can include things like your webcam, microphone, images, browser or your monitor output.
4. Bottom Center panel you have the Audio Mixer, this allows you to monitor microphone levels and devices.
5. As you can have multiple Scenes the Scene Transitions window lets you define how to switch between your scenes.
6. Over in the right corner we have the Controls. Where you can
- Start and Stop Streaming and Recording.
- Start Virtual Camera allows you to output the OBS as a virtual camera to other applications like Zoom or teams.
- Studio Mode: Normally the stream preview only has a single video window, which just shows your active stream view. However, if you click the “Studio Mode” button over on the right, you then have 2 previews, with transition controls between them. The preview on the right is the active stream preview that your live viewers or recording file sees. The preview on the left is whichever scene you select. This is handy for editing scenes on the fly, or prepping scenes before you switch.
- Settings allows you to change the configuration of OBS we will go over these shortly.
7. The bottom bar is worth pointing out. This contains your recording and streaming timers, current frame rate, and a CPU usage indicator. This is useful for checking your stream bandwidth health, recording time, and overall
system performance.
Auto Configuration Wizard
OBS is highly configurable to ensure you get the best quality recording or stream possible with the hardware you have in your machine or your internet speed.
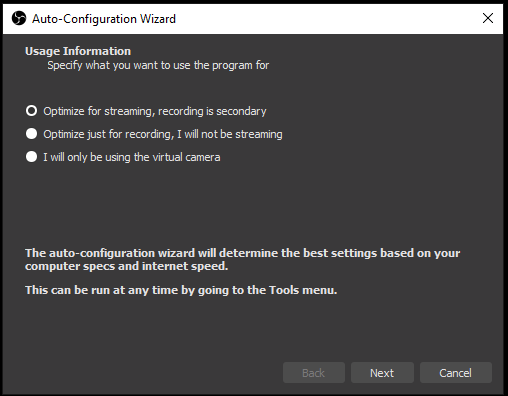
This includes configuring things like resolution, bitrate, encoder and streaming provider. If this all sounds a bit foreign and you just want to get started quickly don’t worry, OBS includes an auto configuration wizard. The wizard will automatically test your system and attempt to find settings that your Machine can handle.
You can always review these settings or save them under a profile and then tweak as you become more familiar and discover what works best for your environment.
The Wizard should start automatically the very first time you fire up OBS. Or you can access it from the Tools Menu. It will ask you want your specific use case for OBS Are you planning on Streaming or Recording or just using the virtual camera and then optimize based on your selection.
Creating your first recording
1. To create a basic recording using your camera follow these simple steps:Add a scene by clicking on the plus button in the Scenes panel in the bottom left corner.
2. Give the name a scene like “Talking Head”
3. We will need to add a Video Capture device to the scene. With the scene selected click on the plus button on the sources panel. This will display a list of possible sources.
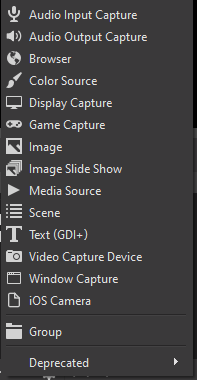
4. Select the Video Capture Device and give it a name in the Create new field. In the properties window select your webcam device. Usually this will be your integrated webcam or an external connected webcam device. Note you can also play with the settings for this device to get the best possible resolution and FPS (frames per second). Recommend exploring these settings. Click OK. You should now see your camera has been added to the scene and you can move the camera placeholder around the frame and resize to fit the entire window etc.
5. Next you will want to add a Audio Capture device to your scene so you can include your audio when speak. Again click on the plus button within the scene and choose Audio Input Capture and select your integrated or connect microphone device and click OK. You can verify the audio capture device is working by checking the bars on Audio Mixer panel. You should see a decibel bar for your device fluctuate when you speak indicating it is picking up your audio correctly.
6. That is all you need now you are ready to record yourself. Simply click on the Start recording button. To stop click the Stop button.
7. To find your recorded video click File menu -> Show recordings.
Capturing your Screen or Application
Now if you wanted to share your screen or application as part of the recording you have several options. Lets take a quick look at these as it might vary on your requirement or machine setup.
The easiest method or my preferred method to share my screen is to create another scene lets call it Screen Capture. With this scene selected I add another Device this time I Display capture. Fortunately, I have several monitors attached to my development environment so this works well. As I can control OBS in one monitor while demoing the application in another monitor and capturing that monitors output in OBS.
If you do not have multiple monitors don’t worry, rather than add Display Capture device you could add either Browser – this would let you capture the browser output if you wanted to demo a website/application. Alternatively you could Window capture if you wanted to capture a running application like Chrome or even Powerpoint if you were sharing a presentation.
OBS Video format
OBS support multiple video formats and by default OBS will record in .mkv. You can change this to mp4 but before you do let explain the differences between the two.
- mkv – is one of the most flexible container formats available, but it’s not widely supported. It can hold just about anything and supports a full range of subtitle, chapter and audio options. However, encoding and playback requires the installation of third-party utilities. It’s also freely licensed, avoiding the patent-encumbered status of most container formats. Most importantly if for some reason your machine or OBS crashes during a recording the mkv video up until the point of the crash will be functional.
- mp4 – is more widely supported and flexible and might be the best all-purpose format. They’re not as infinitely flexible as .mkv files, but they support the majority of modern-day codecs and include options for streaming, chapters, subtitles and more. MP4 files are natively supported by nearly every modern device. However if machine or OBS crashes during a recording your video will become corrupt and useless. As it requires a finalization process to take place before it is usable.
You can change the default settings from .mkv to .mp4 and OBS will warn you against this for the reason stated above.
Converting mkv to mp4
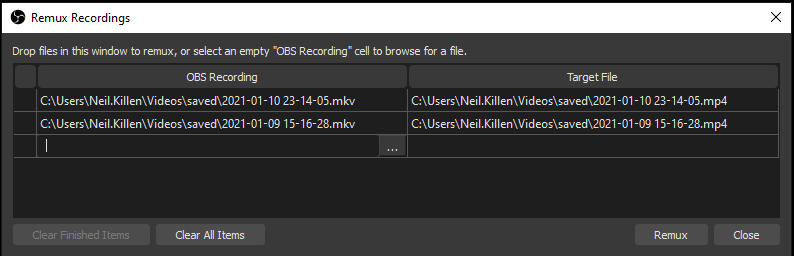
OBS allows you to easily convert video from one format to another. So even if you record in .mkv you can easily convert to other formats via the File -> Remux Recordings.
Useful Info
Have Fun!

Got a lot of love for OBS! In particular the automations you can attach to scene transitions. That way, you can use midi devices (or keyboard buttons) to trigger moving between different scenes.
LikeLike