In my previous post, I looked at the importance of load testing. In this next post in this series on load testing, I will show you how to use JMeter to create a simple load test, take a look at the various JMeter’s components and some features you should familiarize yourself with to help make load testing easy.
- JMeter is a Java application as a pre-requisite you will need to install the latest 64bit JDK or JRE.
- Download the latest binaries and unzip to a directory, for example, c:\jmeter.
- To run navigate to the \bin directory and run Jmeter.bat or if you are on a mac jmeter.sh.
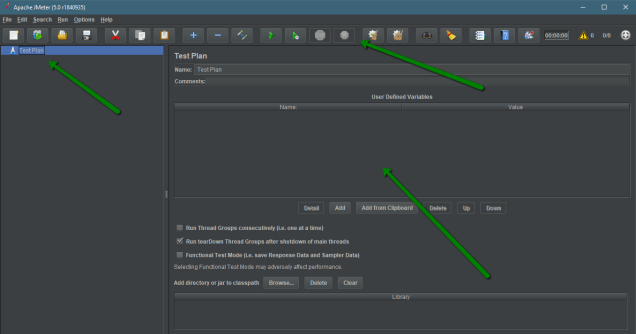
JMeter UI overview
The UI is divided into three main functional areas:
- Menu bar – provides access to a lot of the main functions and provides relevant information to current running tests.
- Left panel – contains a hierarchical tree view of one or more test plans and the various components contained in the plans.
- Right Panel – this is where you will spend most of your time configuring various components or viewing any associated output from components contained in plans.
The functions on the menu bar are self-explanatory however let me touch on a few you will use regularly:
- Start – use this to run your test.
- Start without pause – if a pause timer is configured in the thread group it is skipped.
- Stop – abruptly stops the test.
- Shutdown – stops the running test gracefully by allowing running threads to complete.
- Clear – clears the current log and result window.
- Clear All – clears the log window and all Listener results.
- Elapsed Time – shows the time taken for the current test.
- Number of Errors – displays the number of errors encountered in the current test. Clicking on it will display the errors.
A quick & simple load test
Before diving into the various components of JMeter let’s create a very simple load test. We are going to hit a local Sitecore instance with 30 concurrent users.
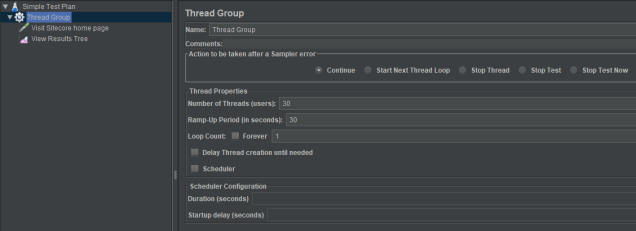
1. First thing you need is a thread group. Right click on the Test Plan node -> add -> threads -> thread group
- Set number of threads = 30
- Set ramp-up period = 30
So each second JMeter will start 1 Thread until all threads are started by the time the 30 seconds are up. We will leave the rest of the setting as they are for now.
2. Next, we will add a HTTP request sampler. Right click on the thread group -> Add -> Samplers -> HTTP request
- set the name – visit Sitecore home page
- Set the server name or IP – we will enter the url for my local instance: sandbox.sitecore.local
- Set the protocol – if nothing is entered it will default to http.
- Set the path – we want the root directory so forward slash
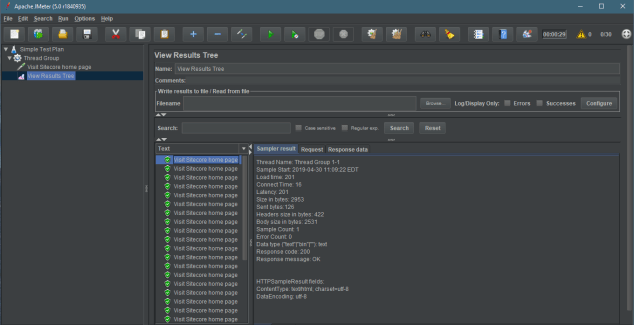
3. Next, we will add a Listener to capture the results. Right click on the users thread group -> Add -> Listener -> View Results Tree
We now have all the elements for a really basic load test and are ready to run the test plan. To run hit the Start button on the menu bar.
When JMeter is running, it shows a small green box on the far right-hand side of the menu bar. The numbers to the left of the green box are the number of active threads / total number of threads. To Stop the Test, press Stop button or the test will stop once all threads have completed.
When JMeter has completed processing all the controller and samplers for the configured thread group it will stop. We can check the output in the View results tree Listener. We expect to have 30 successful transactions of the home page in the view results tree. Green indicates a successful request and if the request failed it would show red.
So in the scenario above, we had 30 threads and each thread hit the home page one then finished. If you wanted to sustain the load for a period of time with the same concurrent users hitting the home page repeatedly for say 5 mins we would need to make the following adjustments to our thread group.
- Select the Thread Group
- Enable the Forever Checkbox
- Enable Scheduler
- Set the Scheduler Duration to 300 seconds
That’s it you are now ready to run the load test again this time it will run for 5 minutes with 30 concurrent threads once they have all started hitting the home page for the duration.
JMeter Components
Now let’s take look at the various components available in JMeter. Having an understanding of what is available will help you create a more robust Load test scripts.
Test Plan – defines all the components and steps required to execute your load test.
Thread Group – as you have seen in my basic test this is where you define the number of threads (concurrent users). You can define the following in the default OOTB thread group:
- Number of Threads – each JMeter Thread represents a virtual user. The number of threads = the number of virtual users
- Ramp-up Period – the time frame (in seconds) for all requests to start. All the threads specified in the “Number of Threads” input will start within “Ramp-up period”.
- Loop Count – the number of iterations for each Thread, by default it is set to run once.
- Scheduler – this allows you to enter the duration and startup delay in seconds. If enabled JMeter will wait the configured Startup Delay before starting the Threads in the Thread Group and run for the configured Duration time.
JMeter Thread group behaves as follows:
- All Threads specified in the “Number of Threads” for the Thread Group are kicked off within the bounds of the “Ramp-up Period”
- Each Thread starts executing Samplers top to bottom (or according to the Logic Controllers, if any)
- When the last Sampler is finished, the Thread starts over (if there are any Loops left)
- When there are no more Samplers to execute and no Loops to iterate, the Thread shuts down
Samplers– are used to send different types of requests from Jmeter to a server. Each sampler generates one or more sample results. For a complete list of samplers right click on a thread group -> Add -> Sampler.
Logic Controllers – are used for controlling the order in which your samplers are processed. There is no shortage of these providing you lots of flexibility to construct and order your test samples:
- Simple Logic Controller does not actually provide any functionality other than let you organize your Samplers and other Logic Controllers.
- Loop Controller loops through its controllers a certain number of times.
- Once Only Logic Controller processes the child controllers only once per thread.
- Interleave Controller alternates among each of the other controllers for each loop iteration.
- Random Logic Controller picks one of its sub-controllers on each pass.
- Random Order Controller executes each child element at most once, but the order of execution of the nodes will be random.
- Throughput Controller allows yo to control how often it is executed.
- Runtime Controller controls how long its children will run. The children will continue to run until the configured Runtime(s) is exceeded.
- If Controller allows the user to control whether the child elements are run.
- While Controller runs its children until the condition is “false“.
- Switch Controller runs one of the subordinate elements on each iteration, but rather than run them in sequence, the controller runs the element defined by the switch value.
- ForEach controller loops through the values of a set of related variables. Every sample (or controller) is executed one or more times, with each loop the variable has a new value.
- Module Controller provides a mechanism for substituting test plan fragments into the current test plan at run-time.
- Include controller is designed to use an external JMX file.
- Transaction Controller this is useful if you want to measure the overall time taken for a group of nested samples.
- Recording Controller provides a place holder indicating where the proxy server should record samples to.
- Critical Section Controller ensures that its children elements will be executed by only one thread.
Listeners – let you view the results of Samplers in the form of tables, graphs, trees, or text in a log file. I’ll cover these in more depth in a follow-up post but here are some of the commons ones:
- View results in a table.
- View results tree.
- Summary Report.
- Aggregate Report.
- Simple Data writer.
Timers – help provide a more realistic test scenario as Jmeter by default will send request between each sample without pausing. Actual users will pause between requests as they process the info presented to them. This is known as Think Time and Jmeter provides different types of timers to help add the right amount of between samples:
- Constant Timer – will pause for the same amount of time.
- Gaussian Random Timer – pauses each thread request for a random amount of time.
- Uniform Random Timer – pauses each thread request for a random amount of time, with each time interval having the same probability of occurring.
- Constant Throughput Timer – introduces variable pauses, calculated to keep the total throughput as close as possible to a given figure.
- Precise Throughput Timer – introduces variable pauses, calculated to keep the total throughput as close as possible to a given figure. It works best for rates under 36000 requests/hour.
Assertions – help you validate the response of each request. You check the response code or use a regular expression the check the content in the response. Other handy assertions types include checking response Time and even Size of the response.
Configuration – these components make it easier to configure your tests by promoting the reuse of any values or settings you need to run your tests. Here are a few of my favorites but I recommend checking out the Jmeter guide:
- HTTP Request Defaults – instead of having to set the server name/ip & protocol values for each of your HTTP requests you can set them once and have them reused for each request.
- HTTP Header Manager – lets you add or override HTTP request headers.
- HTTP Cookie Manager – you need to add one these when testing your Sitecore site
- Login Config – you can add or override username and password settings in samplers that a use username and password.
- User Defined Variables – lets you define variables with default values and have them reused in your tests. If a value is not provided at run-time non-gui Mode the default is used. I’ll talk more about these later with a good example when I show you how to configure your load test to be run against multiple environments.
- CSV Data Set Config – this is really useful for configuring custom data used by your tests. As it will read lines from a csv file, and split them into variables. Take an example of an e-commerce site where we have a scenario of the user performing a search for products. To simulate real users I want to run different search requests for each user. To achieve this i’ll add different search terms to a csv. JMeter will read the CSV file and add the term to a variable that I pass in my HTTP Search request. With each thread Jmeter will read a different line from the file, passing a different term to my search feature.
Handy JMeter Features
Change Controller – you can easily change a controller by right clicking and select change controller. This saves you from having to create a new one a remove the old.
Log Viewer – you can enable the view logs at runtime without opening the .jtl file. From the options menu enabled the log viewer. The Log Viewer will display in the bottom of the right panel.
Duplicate – you to easily duplicate any item in the tree easily by right-clicking on the item and select duplicate. When you duplicate an item all child items are also duplicated. This is useful for experimenting with different test plan variations during development.
Copy & Paste – You can copy and paste an entire tree and all its child components from one controller to another or from one Test plan to another.
Add Think Times to Children – If you right click on a Thread group or Controller selecting this option it will add think time between every child sample. This is a really quick way to add timers. However, it will default to the Random Uniform Timer with a default pause of 1 second. You can change this by modifying the settings in the JMeter properties file.
Additional Info
- Download JMeter
- Getting Started with JMeter
- Measuring performance under load
- Load Testing with JMeter Advanced
In my next post, I’ll go into some more advanced JMeter topics.
Happy Testing!!

4 thoughts on “Load Testing made easy with JMeter”