Sitecore just added the ability to create custom hostnames in XM Cloud Portal. Previously, this could be done using the Edge platform admin API. But now they are even easier to manage!
Custom hostnames allow organizations to align their domain names with their brand, other benefits include: – Ensures first-party tracking – Enhances SEO – Improves media search and indexing – Reduces CORS and blocklisting issues – Simplifies access to APIs
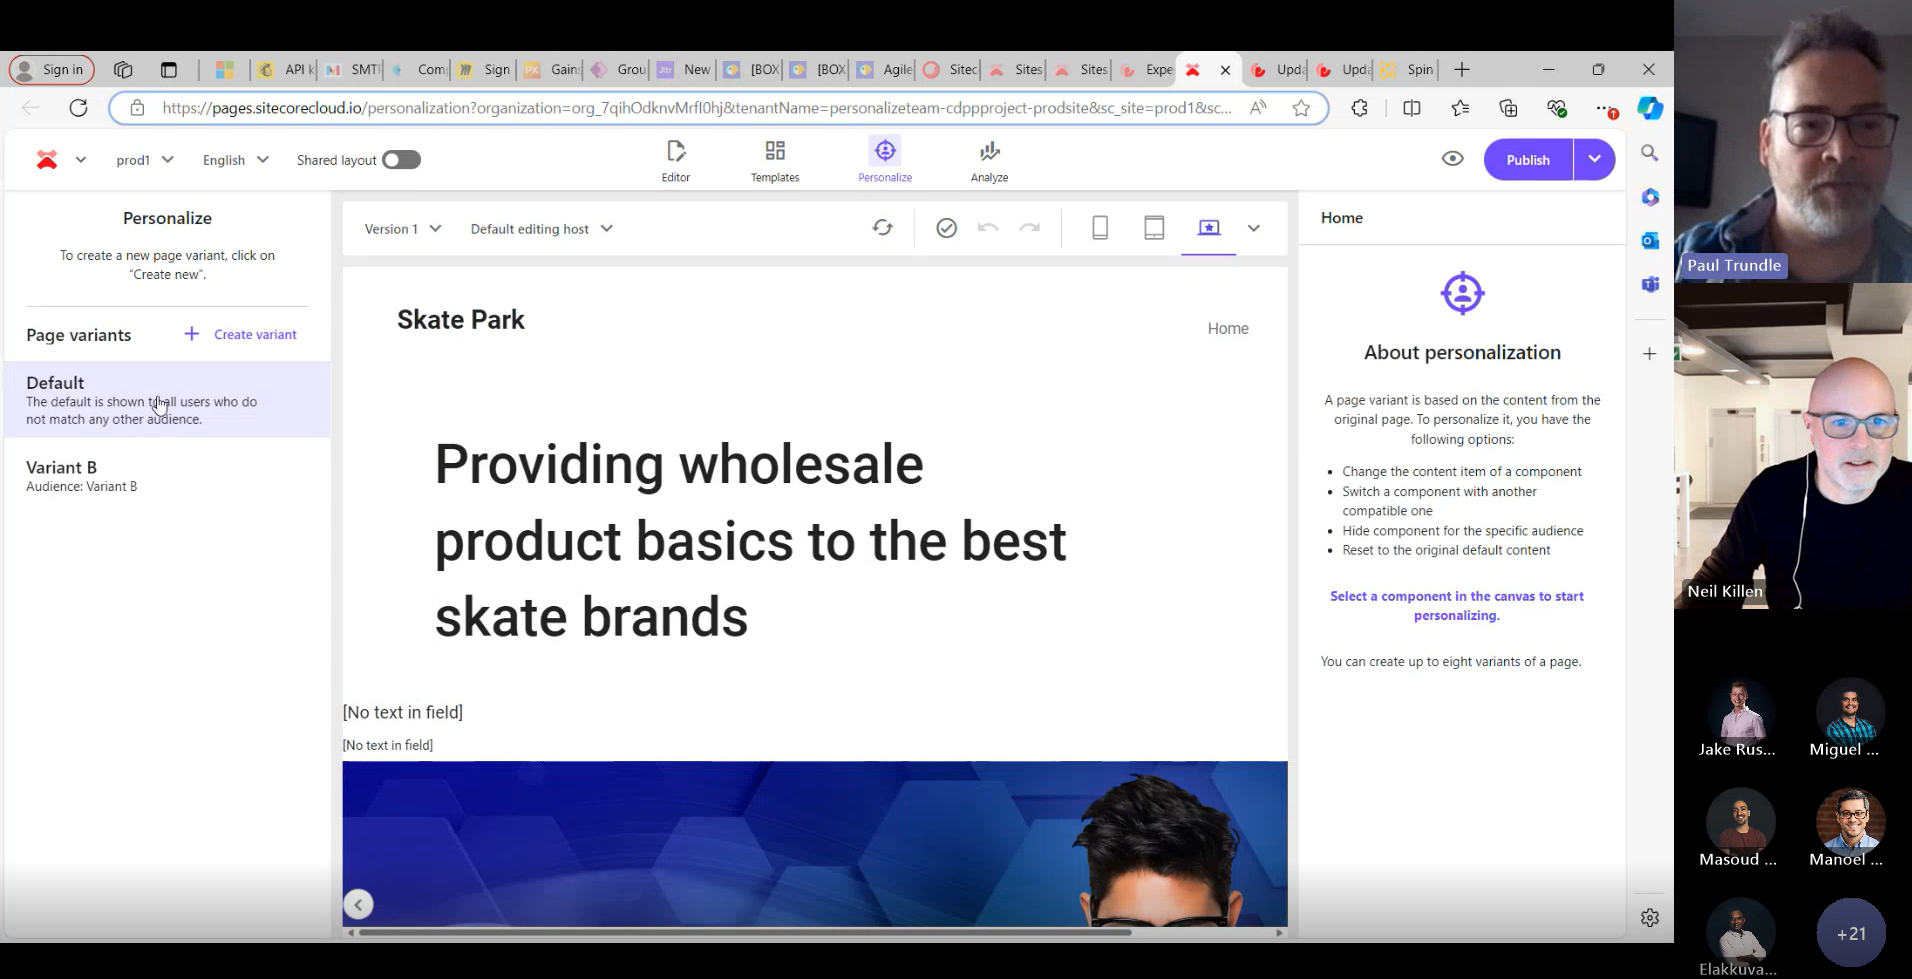
Senior Product Manager Paul Trundle joined our Craft Circle meetup last week to discuss and answer questions about the recent product updates and future innovations in Sitecore Personalize. From notifications, entity migration and the their recent A/B/n testing feature in XM Cloud to a cutting-edge journey orchestration and conditions builder, the session offered a glimpse into how Sitecore are acting on feedback from marketers and developers to incorporate features that make it intuitive to craft smarter, more engaging personalized experiences. This post dives into those recent feature and explores some of the roadmap features Paul shared.
Enhanced Notifications
In June Sitecore Personalize included a new feature making it easier to stay updated on changes to your experiments and experiences with notifications. You can enable notifications for your own email address or add multiple recipients to keep your team informed. Once set up, recipients will receive alerts whenever an experiment or experience is started, completed, paused, or resumed. Each notification includes details about who made the change, what action was taken, and when it occurred—along with a direct link for quick access to the specific experiment or experience. To update the recipient list, head to the Notifications tile and remove any unwanted email addresses.
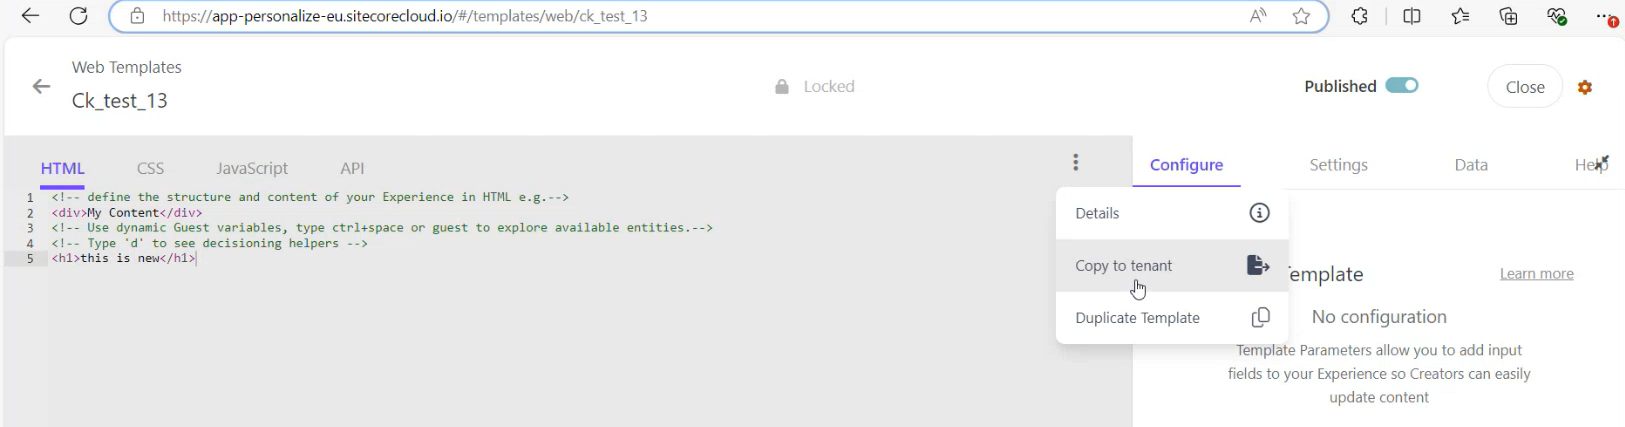
Copy To Tenant
The Copy to Tenant feature allows you to easily copy entities between tenants within the same region. With just a few clicks you can easily copy web templates, conditions, decision templates, JS modules, connections, offers, offer templates and your point of sale.
1.From the entity you want to copy simply choose Copy to tenant option:
2.Choose your destination (it must be within the same region):
3.Create an exact copy of an asset or rename the asset before you copy it to the destination tenant:
4.Personalize will also perform collision detection and warn you if there is an asset with the same name in the destination, preventing you from potentially overwriting an existing entity:
As you can see this makes it really easy to transfer your entities between your tenants.
At Sitecore Symposium Derek Fahey, in his session Sitecore CDP: Unlock your data with Unified Tracking, shared how this new feature streamlines the collection and sharing of customer traits and events to enhance users experience across the Sitecore suite of products and eventually other external digital touchpoints.
I recently invited Derek to join our Sitecore Craft Circle at Valtech and share with our community this new feature and future roadmap features it enables.
Unified Tracking
Unified Tracking is Sitecore’s solution to reduce tag bloat and simplifies sharing of user event data across Sitecore products like CDP, Personalize, and Search. It allows developers to track user interactions (like page views and clicks) through a single integration using the Cloud SDK. By consolidating event tracking, Sitecore enables consistent data collection and distribution across its ecosystem, creating a streamlined experience for both users and developers.
The unified tracking id also known as the browser id in Sitecore CDP or Personalize will be common across the suite of Sitecore Products. Allowing you to easily track the users behavior across Sitecore products.
Currently available with several customers already taking advantage of it. If you are interested it taking it for a spin then you’ll have to get it activated for your tenant(s). This can be done via support ticket to Sitecore who will enable it. Sitecore are currently working on improving this process, in the future we should be able to activate/deactivate this ourselves within the Portal.
As solution providers, we often think to build something that meets our clients specific requirements we need to build it from scratch. Given the time, budget, and resource constraints it’s usually not viable to build a great working poc or demo for a potential client that will blow their socks off. With OrderCloud while it is an amazing platform enabling you to build all sorts of B2B and B2C commerce solutions, whether it’s a fully fledged commerce website or a simple tool that meets the needs of a business user to allow them to manage promotions you need to build it! But what if you took an alternative approach? What if you could utilize a Low-code/No-code platform to quickly and more easily create that winning poc or internal back office applications? This is a topic I shared during SUGCON Europe 2024 in Dublin.
Pillars of Modern Ecommerce
To be successful in e-commerce you need a great Product, and a vision along with some smart people, loyal customers and the right technology stack to help execute and support your vision.
We’ve seen a shift from Monolithic all-in-one e-commerce platforms towards modern composable headless platforms. These Modern platforms provide:
Flexibility – greater flexibility flexibility allows development teams to make changes easily and rollout new features much quicker than before.
Integrations – They can easily integrate with existing systems and support new integrations.
Omnichannel support– With the explosion of channels over recent years the ability to create a seamless customer experience across all channels and touchpoints is key. So, irrespective of whether the customer orders online or chooses a product in-store and asks for it to be delivered to their address, their experience with your brand should be seamless and positive at every stage of their journey.
Customizable – No two businesses are the same they all have a different customer base with different user journeys and requirements. While all commerce platforms share a common set of features these should be easily customizable to meet the specific needs of the business now and as it evolves.
Scalable – And as the business grows the platform must be capable of scaling up to handle the increased traffic without performance degradation.
OrderCloud
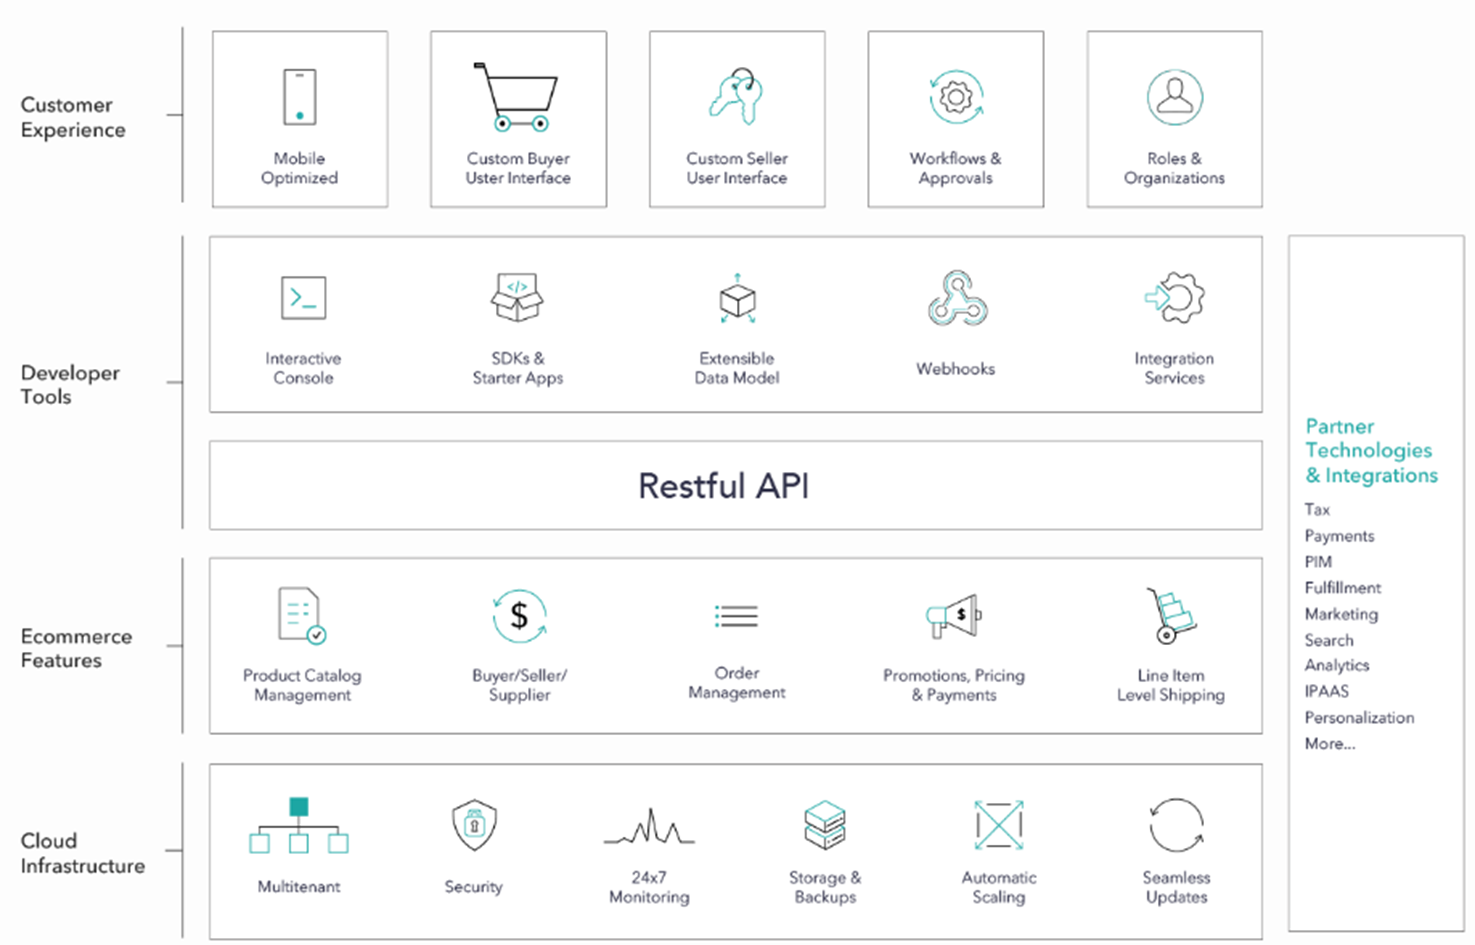
OrderCloud is a SaaS Ecommerce platform. Due to high degree of configurability it is capable of handling complex B2B, B2C and B2X scenarios. Through its powerful features and headless Rest API architecture you can assemble a commerce solution to meet your clients exact requirements. Whatever commerce functionality a client might need you can build it with OrderCloud.
Once you’ve defined these requirements then you can start building the required applications needed to support it. Were not just talking about creating their online store, were also talking about POS, Backoffice applications. They might need a back office application for managing the products, catalogs and prices, managing order and prices you can build it.
Complex Retail Customer Journeys
I attended Klaus Petersons session during SUGCON titled: Retail Order Management – the real examples. Klaus is an long-time experienced expert in Sitecore and ecommerce. In this he described the simple to more complex Omnichannel user journeys in retail. Some of those journeys might include the following:
Buy In Store with immediate delivery.
Buy online and pick up in store with own stock.
Buy online and pick up in store without own stock (click and collect).
Buy in store, split between immediate order pick up and pick up in a different store.
Buy in store split between immediate order and delivery at home.
Buy in store split between immediate order and pickup from different store (no stock).
Buy online and spilt between delivery to home and pick up in store with stock.
In his session described how you need to really thing about each of these journeys as a they directly impact how you go about constructing your OrderCloud solution and configure the entities available in OrderCloud.
What is OrderCloud?
Describing OrderCloud to a potential client can be a challenge. As it is a bit of a black box. All of its features are hidden away behind its RestAPI. While you can completely customize the Buyer and Seller Applications you must Build It!
This is also its Strength. As you can Build to the exact requirements after you’ve determined the operational approach. To help you build, OrderCloud provides some Developer Tools, SDKs, and some additional tools and there is some great sample implementations that can help you get started.
Interactive Console
The interactive API Console is the only thing you get that resembles an interface OOTB. Allowing you to run queries against your data. I’ve heard it described by someone in the community as “Postman on Steriods..”
PLAY! Summit- Custom Buyer Interface
The Demo team created PLAY! Summit – A headless commerce solution built to showcase the power of Composable Sitecore DXP. Using Sitecore XM, Content Hub, CDP and Personalize, Discover and OrderCloud. Which is great for demos or just wanting to learning. It might not represent exactly what it is the customer wants but helps tell the story of what is possible!
Headstart React Admin
The Headstart React Admin is a example of a seller application built on top of OrderCloud JavaScript SDK. It’s not a production ready application but is a great starting point to teach developers how you could implement a back-office application using OrderCloud Javascript sdk and APIs.
It was Built using react, nextjs, typescript, chakra ui, and various other tools. Features include ability to manage:
Products inc facets, prices, catalogs
Promotions
Buyers
Orders and their returns.
Suppliers
Security
Tech Transformation Initiative Backlog
So whatever you need you can build it. You just need the budget, developers, and time to build it. With these constraints many companies often have a backlog of tech transformation initiatives they need to implement.
With the onset of the pandemic most companies had to accelerate these initiatives. Many discovered there was a shortage of available skilled resources capable of implementing their projects. So they started looking at alternatives being offered through Low Code and No Code Platforms.
”70% of new applications developed by organizations will use low-code or no-code technologies by 2025,up from less than 25% in 2020” Gartner Research
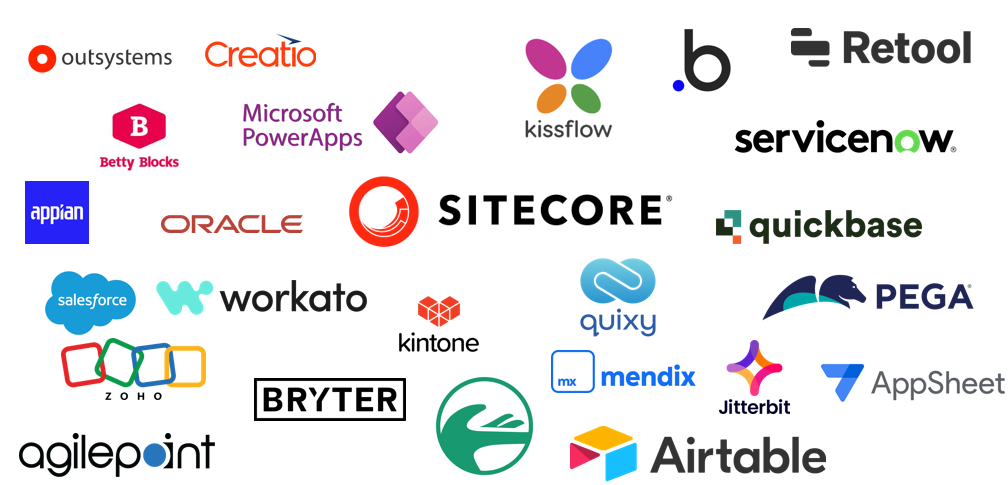
Increase in LCNC Platforms
There has been a steady increase in the number of LCNC platforms while existing platforms have been adding Low Code / No Code features to their platforms.
We’ve increasingly seen these features being added to the Sitecore products so that non-developers can assist in implementing solutions that were normally only something a developer could do.
Sitecore Personalize – when you create decision models in Personalize you are using a Low Code / No Code interface, allowing you to drag and drop decision elements onto the canvas to construct your Decision Model.
Sitecore Connect – is Workato under the hood allowing you to create workflows using a drag & drop application to construct your system integrations.
Sitecore 10.4 – provides the ability to customize visitor profiles without a needing a developer – through a new no-code user interface to allow marketers to extend visitor schemas to support common scenarios without developer involvement, while still retaining the advanced customization capabilities already available for developers
Benefits of Low Code / No Code
The reason being is some of the Benefits that these low code / no code platforms offer to businesses LCNC have:
Democratized – the delivery of applications, by enabling more people within the business to get involved in ideation, poc’s and implementations of tools that help and support the business.
Reduce Costs – as applications can be built quicker and in theory by non-technical people the can have a significant reduction in costs.
Faster-time-to-market – using LCNC platforms enable applications and new features to be delivered much quicker than traditional methods. This an accelerated time-to-market enabling businesses to be more agile and can give them a competitive edge.
Improved Efficiency – by enabling non-technical folks to deliver or manage feature enhancements themselves this provides efficiencies for the business by allowing your technical team to focus on other more critical applications while providing more of a consultancy role rather than always being hands on.
Citizen Vs Traditional Developer
The idea of non-technical users developing solutions is nothing new. The term “citizen developer” was first coined by Gartner in 2009 but has grown in popularity with the rise of LCNC platforms.
These individuals have little to no coding knowledge and work outside the IT department, yet they possess the ability to create custom applications for themselves, fellow employees, and even customers. They leverage low-code/no-code platforms with visual interfaces and drag-and-drop builders to connect components and create software without writing code.
Traditional Developers get to benefit from Low Code / No Code tools. These tools help streamline the development process by removing some of the more mundane tasks. As development languages, tools and platforms continue to evolve so has the developer experience, making it easier in some ways for us to deliver solutions more quickly and more efficiently, by enabling us to focus on more complex and critical tasks.
Using LCNC with OrderCloud
While exploring the Low Code platform: Retool it occurred to be why not try and build a backoffice application for OrderCloud, providing similar features as those provided with the Headstart React Admin.
I could have chosen any of the LCNC platform but I was interested in Retool having read some articles about the platform and how it is mainly used by engineering teams to quickly create utilities to improve efficiencies.
Retool is a Low Code platform targeted at developers to help them build internal applications quickly and efficiently. It supports RestAPIs, GraphQL and SQL and allows you to create poc’s and simple applications in hours and days rather than weeks.
During a recent Content Hub upgrade I was surprised to find how little information there was available on the actual process involved. In this post I will share my findings and lessons learned during this process. This information is relevant to upgrade of versions prior to Content Hub 4.2. As from 4.2 onwards Sitecore introduced Automatic Upgrades meaning that upgrades are performed automatically and on a regular cadence.
Why Upgrade Content Hub?
New features& Enhancements – everyone loves shiny new features and Content Hub development are continually adding new features and improving existing features. Being on the latest version allows you to take advantage or those features and provide a better Authoring experience and User Experience for both your users and customers.
Bug Fixes – each release includes several bug fixes that have been identified in earlier version based on priority and impact when you upgrade you should notice these improvements or some pain points you may have had are no longer an issue.
Seamless upgrades and versionless SaaS model – as mentioned previously when you upgrade to the latest version you will be on the Sitecore Content Hub’s versionless Software-as-a-Service (SaaS) model. No more version specific upgrades, you can benefit from latest features and improvements without the need for complex and time-consuming upgrades. Updates will be deployed automatically and identified by dates to your Content Hub instances on a regular cadence. However, if an upcoming release contains breaking changes you will be notified at least one month in advance. That particular update will be deployed to your non-production first, then 14 days later it will be deployed to your production instance. Giving you time to test and mitigate any breaking changes before they hit Production. If you would like to read more on this topic checkout this post by Tim Marsh.
Sitecore cannot guarantee service availability for versions 4.0 and 4.1 after June 30, 2024, and for versions 3.x after December 31, 2023.
Assistance with errors or unexpected behavior during code or configuration promotion, or development activities. Versionless Only.
Addressing product defects. Versionless Only.
Things to consider
Before scheduling your upgrade here are some things you should take into consideration:
Breaking Changes – depending on your current version you are upgrading from you will need to review the list of breaking changes in each of the release notes from your current version to the latest version and check if any of these are applicable or are a risk.
Sitecore has changed the structure of the automatic release notes as it no longer has a release number and they are organized by date following the release cadence with a new format. I did notice there are fare fewer breaking changes in these releases.
Customizations – review any integrations, custom pages, external components and custom css that you have within your solution and assess the risk. You should upgrade your lower environments first before production as that will allow to assess impact and resolve any issues before applying the upgrade to Production and mitigating any risk.
Downtime – there will be downtime incurred during the upgrade and the length of that depends on your current version and the size of your solution. Downtime could be anywhere between 4 and 8 hours but it should not be more. The Service Request team will perform some analysis when you make a request to upgrade and provide with an estimate of the actual downtime they anticipate to help you plan and schedule the actual upgrade. What to expect during downtime:
Content Authors will not be able to access Content Hub.
Content Hub Rest APIs will not be accessible. This is important if you have built custom web services or have other applications consuming these Rest APIs as you will need to consider how to best handle this service unavailability during the Production upgrade.
Content sync’d to Sitecore using SCCH will be fine you just won’t be able to sync any new or updated content during the upgrade.
Rollback – if whatever reason the Sitecore service team handling the upgrade run into any unexpected issues and are unable to resolve within a timely manner they will perform a rollback using a backup they take prior to the upgrade. This actually happened during our the upgrade of our production environment even though both non-production environment upgrades went off without a hitch. The service team were able to diagnose the root cause and we rescheduled the upgrade with confidence they could complete the upgrade without having to rollback. An unexpected inconvenience but we got there in the end.
High-level Task Overview
During any upgrade I like to define a list of the steps involved and define the roles/responsibilities, estimated LOE, expected start and end dates and then document actual start and end dates. This information is super useful in helping to plan each of the environments to be upgraded. Capturing any lessons learned for each task between upgrades will help to improve the process and mitigate risk. This helps with planning and tries to ensures there are no unexpected surprises when you get to production. You should plan to upgrade the lower environments first i.e your Dev environment, following by QA and finally Production.
Review Breaking Changes – list out all the breaking changes listed in the release notes between current version and latest version. Review the list and determine if any of these are significant or are a cause for concern determine any risk and how that could be mitigated.
Create Service Request for the Environment – raise a service request with Sitecore. They have provided a guide on how to request an upgrade from earlier versions of Content Hub with some instructions about the process. Once the service request is created the Service team will be able to perform an analysis of the Content Hub instance and provide a LOE and expected downtime to perform the upgrade.
Determine Impact of downtime – knowing the expected downtime you can plan for it and/or take any necessary steps to mitigate the impact of this downtime (if any). With this information you can plan with appropriate stake-holders when best to perform the actual upgrade of the instance. This is not such a concern for the lower environments, however it could coincide with other project release cycles. So its important all stakeholders are made aware.
Plan for the actual Upgrade – You will need to plan with all the stake-holder including the Service Sitecore Service request team to ensure they have availability to perform the upgrade on your preferred date/time.
Perform Upgrade – this is handled by the Sitecore Service Delivery team and will notify when is complete and relay any information on the Service request ticket. Once Service delivery have completed the upgrade you can verify by logging into the instance and going to Settings and locating the version in the lower right corner. Once you are on the automatic release this will co-relate to the version date following the new Release Notes format.
Test Content Authoring – your QA team should perform some tests following the upgrade, ensuring they can create the various assets and workflows.
Test Integrations – verify SCCH is working as expected and new/updated assets are being applied as expect to Sitecore. Ensure any custom web service or applications consuming the Rest APIs are working as expected.
Review and test for possible breaking changes – using the list of changes discovered in step one, review each item and test.
Issue resolution iteration – work through any issues identified in steps 6, 7, 8.
Sign off Instance Upgrade – once all stake-holders are happy the instance has been upgraded successfully with all issues being resolved and/or mitigated the upgrade can be signed off. You can then start planning the next instance util all your Content Hub instances have been upgraded.
Once you are done upgrading all your instances you can scrunch this up and throw it away… with the automatic updates you’ll never need it again. One less thing for you think about or invest time and resources. Leaving you to focus on other business critical tasks.
In this post, I’ll share some useful info, handy tips, and tricks to help you get started with Sitecore XM Cloud.
XM Cloud Portal
The Sitecore Cloud Portal is your hub for everything in XM Cloud. You can manage and switch between the various apps seamlessly: XM Cloud, XM Cloud Deploy App, etc. There are handy links to documentation and the Sitecore Support Portal. You can even create new support cases without leaving the portal.
Check out the XM Cloud Introduction it has some helpful information, links, and videos to get you started.
Navigating XM Cloud
Switcher – the multi-dot menu icon opens the switcher and allows you to switch between organizations, projects, and apps.
Home – each App has a home page providing access to the main features.
Admin – if you are the administrator of one or more organizations you can manage members of those organizations, you can:
Quick actions – let you easily access important features.
Apps section – clicking on one of these instances, opens a side panel to the right with direct links to quick actions available for that instance.
XM Cloud Dashboard – where you create and manage your websites and access all your XM Cloud Tools. The Site tab is where you can add websites to your instance in just a few clicks. The Tools tab is where you can access all the features included in XM Cloud. It looks very similar to Sitecore XP and provides access to some familiar tools.
XM Cloud Deploy – allows you to manage projects and environments.
XM Cloud Pages – combines editing and design capabilities for building web pages.
XM Cloud Content manager – this is where you can manage and edit all the content on your website.
XM Cloud Explorer – is an editing tool that lets you work with content independent of presentation.
The biggest event in the Sitecore community calendar, Sitecore Symposium happened last month in Chicago. It was the first time to have this event in person in 3 years. I had the pleasure of sharing some highlights and key takeaways with our Valtech Sitecore craft circle this month. Sitecore have been very busy over the past 12 months and there were a lots of exciting announcements and innovation to share. Whether you are an implementation partner, an existing Sitecore customer or just exploring Sitecore current product offerings – there has never been a better time to build with Sitecore to transform user experiences and businesses.
Symposium Kickoff
In the opening keynote Steve Tzikakis (Sitecore CEO) kicked off the event, outlining Sitecore’s vision for the future. To be the leader in content and a disruptor in engagement and commerce. He made several announcements including 3 new products:
With the explosion of data being collected and consumed by IoT applications and devices along with our insatiable desire for near real-time feedback, has led to a shift in how we handle computing. Performing all the computation at data centers and/or cloud servers is not the most efficient approach as this increase in data consumption requires significantly more bandwidth which only increases latency. Edge computing, allows computation of data to remain much closer to the user rather than going through several network hops, for a cloud server to process the data and return a response. With this computation of data happening closer to the source not only is Edge more performant it is also considered more secure.
Users who have a personalized online experience and feel a connection with your brand are more likely to make a purchase and become loyal customers. However, a poor implementation that adversely impacts performance will have the opposite effect and drive potential customers away.
The probability of bounce increases 32% as page load time goes from 1 second to 3 seconds.
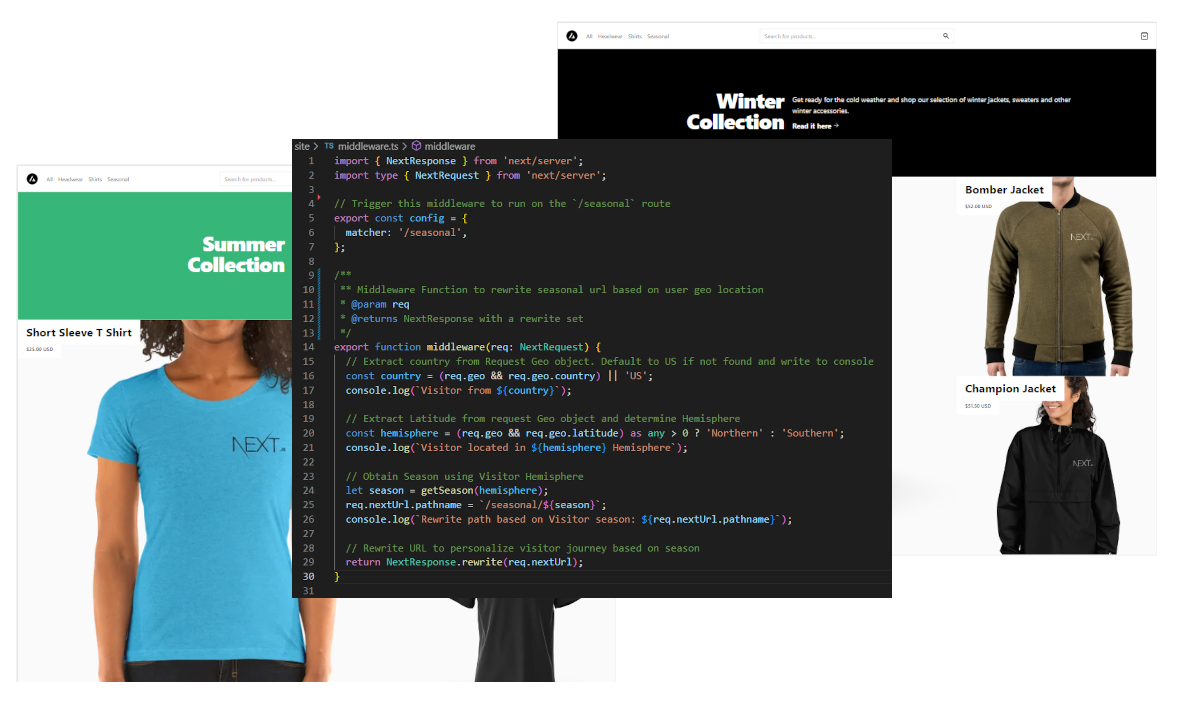
In this post, I will demonstrate how you can improve performance and user experience by moving personalization to the Edge with Nextjs Middleware and Sitecore Personalize using the Sitecore Commerce template created by Vercel. First I’ll show you how to personalize using visitors’ Geolocation to show summer or winter clothing collections.
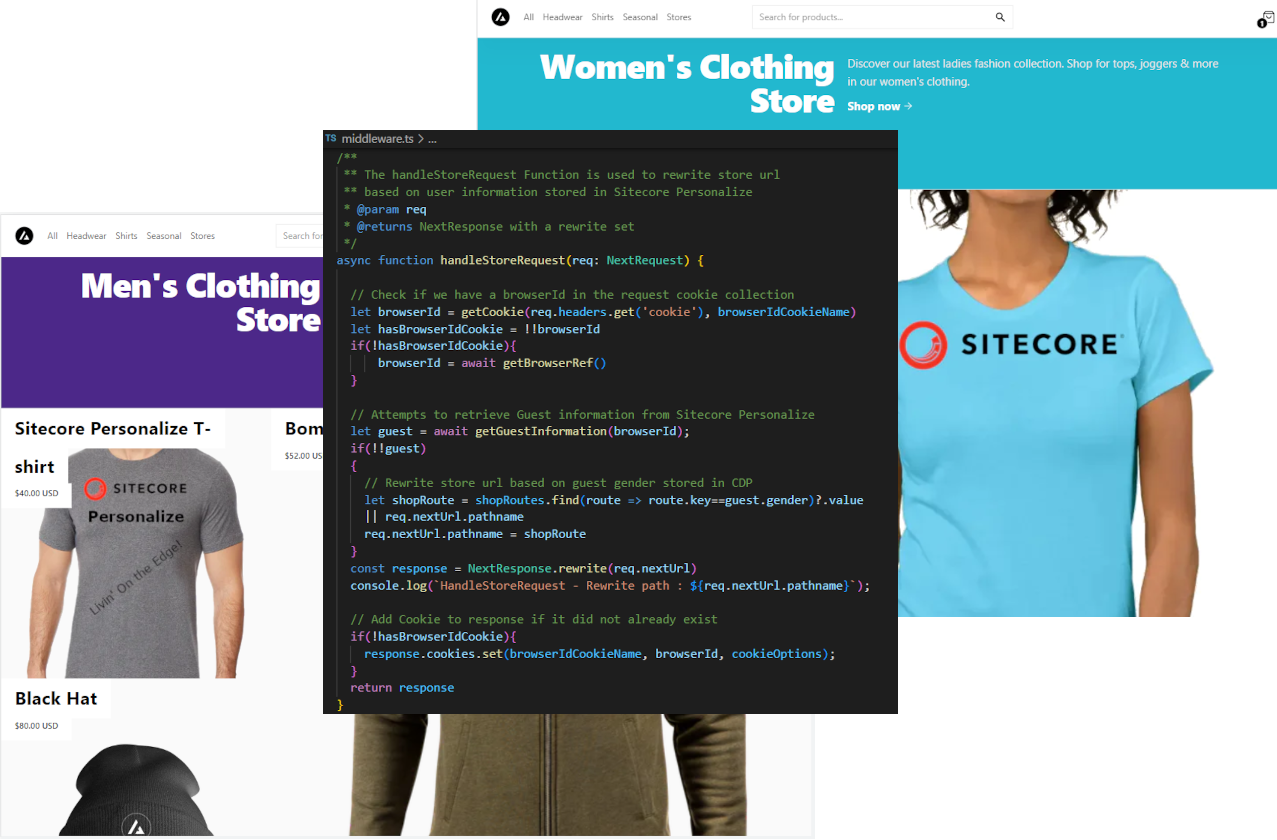
Then we’ll personalize using guest information collected by Sitecore Personalize to display products from our men’s or women’s store.
If you’ve been involved recently with Sitecore on any client pitches for OrderCloud or CDP & Personalize then you would have seen Sitecore Sales engineers demonstrate the power of these applications running on the demo portal using the PLAY Summit. It has been made available to all Sitecore MVPs this week and allows you to quickly and easily spin up an environment and instance to easily demonstrate Sitecore products. For Partners you need to be onboarded via the partner team, you can contact your partner manager to get access.
If you’ve ever been involved in pre-sales then you know how much effort can go into standing up a demo Sitecore Solution to provide your Sales and Marketing teams with something that can be shown to potential new or existing clients.
The goal of the Portal and what the Sitecore Demo team have continually been striving towards – to simplify the process of spinning up a working Sitecore solution, allowing you to quickly demonstrate the main features with each new Sitecore release. It has to be said they’ve had their work cut out recently with all the recent acquisitions and new Products being added to Sitecore. But it has to be said this most recent incarnation of their demo solution and portal is their best work yet! It demonstrates how to spin up a ComposableDXP with Sitecore with a few clicks and some simple configuration. The portal will do its thing and you can review the progress or go make yourself a cuppa coffee and wait until you receive an email indicating your demo instance is ready in around 10-15mins. Awesome!
Taking it for a spin
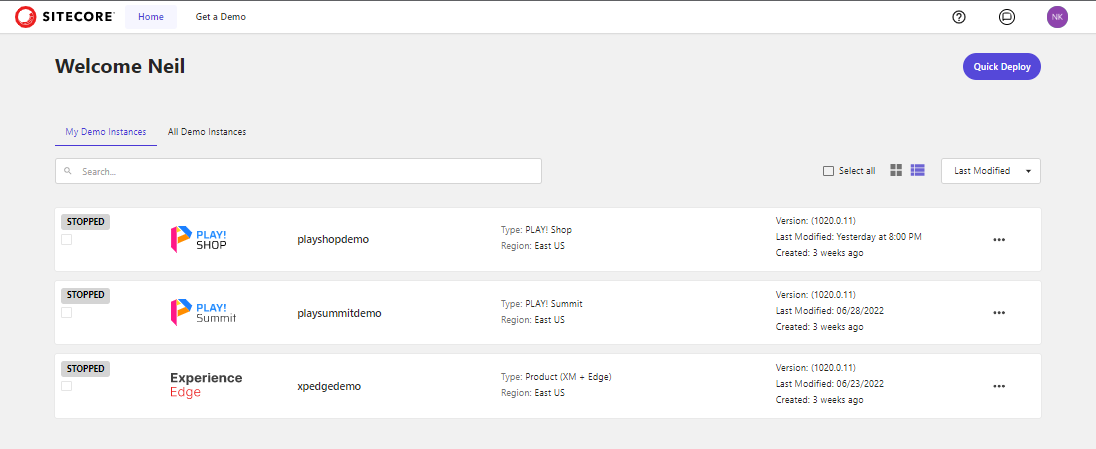
I was fortunate to get early access to take it for a spin. If you’ve not already accessed the demo portal you’ll want to head over and sign in with your Sitecore Partner account. Once signed in you’ll be presented with the portal home screen which will list any current demo instances you’ve created:
As you can see here I have several demo instances available one for each of the demo templates that are currently available.
To spin up and new demo instance Select the Get a Demo menu option or click Quick Demo for a faster wizard-like experience.
The OrderCloud API Console is a pretty awesome tool and an excellent feature to have within the OrderCloud platform. However, I like to utilize Postman when developing against APIs. As I’ve previously demonstrated by utilizing Postman with Sitecore CDP & Personalize and Sitecore Send, in this post I’ll look at using Postman with the OrderCloud API.
Importing the OrderCloud API into Postman
OrderCloud provides an OpenAPI spec and is available at OrderCloud Developer Tools. You can use this definition to import into Postman and create a collection. To import follow these steps:
1. In Postman create a new Workspace -> New Workspace let’s call it OrderCloud API
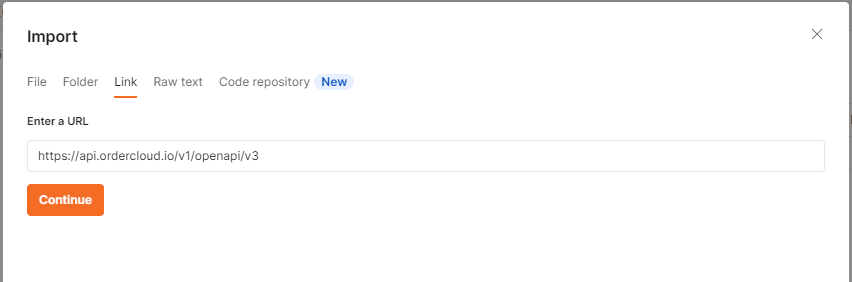
2. Now copy the OrderCloud OpenApi URL documentation endpoint and click on the Link tab and enter the copied URL and click Continue.
3. Use the default setting and click Import.
4. The OrderCloud API definition is imported and a collection of APIs are created and divided into the various functional areas as described by OrderCloud API definition as described in the API Reference guide.
Using the Collection
Once the collection has been created there are a few things you’ll need to set up:
OrderCloud uses OAuth 2.0 for token-based authentication. This means that each API request to OrderCloud requires a valid access token which can be acquired through a variety of OAuth workflows.
Encrypted in the token are the identity of the user as well as the roles that the user has access to. Once validated, the OrderCloud API has enough information from this token to determine which endpoints and data a user can read and/or write.
Tokens are valid for 8hrs and you can renew or create a new token. Generated tokens can then be stored in a variable and reused.
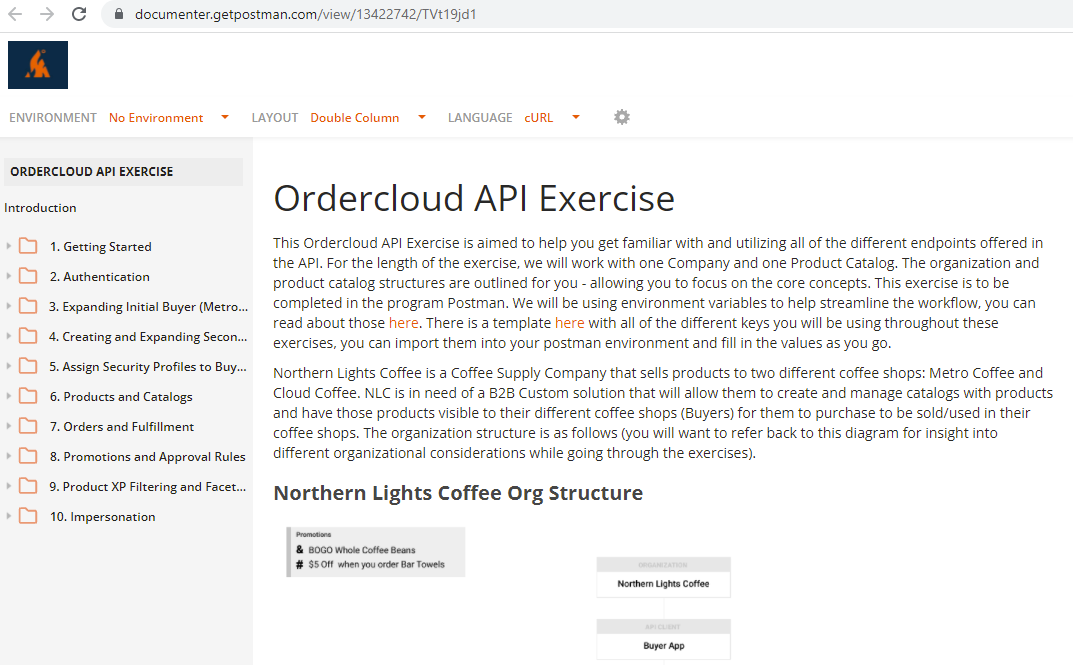
OrderCloud API Exercises
While the APIs are well documented in the Reference guide there is a great OrderCloud Postman Tutorial. These postman exercises will guide you through the steps, data and api requests involved in setting up a fictitious Coffee Shop. This is a really good starting place to learn the various APIs and data structures and how they interact with your OrderCloud data.
To import the exercises into your own local or web postman instance simply click on the simply click on the Run In Postman button located at the top of the exercises to import into with your web or desktop postman instance.
You will also want to import the variables used in the exercises and update them accordingly to your OrderCloud environment instance as you progress through the exercises.